MLIR에서 텐서, MemRef, LLVM 저수준 구조체와 벡터까지 이어지는 3계층 메모리 표현을 살펴보고, NumPy와의 상호운용 및 버퍼화(bufferization), C 호환 래퍼 생성 방법을 예제로 설명한다.

MLIR의 메모리 아키텍처는 고수준 추상화와 저수준 효율성 사이의 균형을 나타낸다. 핵심적으로 MLIR은 데이터를 표현하는 세 가지 주요 방법을 제공한다. 불변이고 추상적인 연산을 위한 Tensors, 구체적인 메모리 버퍼를 위한 MemRefs, 그리고 세밀한 제어를 위한 LLVM 수준 구성요소가 그것이다. 이 3계층 접근은 개발자가 선호하는 추상화 수준에서 작업할 수 있게 하면서도, 필요할 때 메모리를 정밀하게 제어할 수 있는 능력을 유지하게 해준다.
Tensors는 계산을 깔끔하고 수학적으로 표현할 수 있게 해주고, MemRefs는 실제 메모리 연산으로 가는 다리 역할을 하며, LLVM 구성요소는 메모리 레이아웃과 접근 패턴을 직접 제어할 수 있게 한다. 이러한 설계는 MLIR의 점진적 로워링(progressive lowering) 철학에 기반한다. 즉, 고수준 개념을 최적화와 실행을 위해 필요에 따라 더 구체적인 표현으로 체계적으로 변환할 수 있다.
요약하자면, Tensors는 순수한 수학적 객체이고, MemRefs는 구체적인 메모리 버퍼이며, LLVM 구성요소는 저수준 메모리 연산이고, 벡터는 우리가 동시에 조작할 수 있는 여러 레지스터 값에 대한 참조이다. 가장 높은 수준의 추상화부터 시작해 아래로 내려가 보자.
MLIR에서 텐서는 명시적인 메모리 위치가 없는 불변의 고수준 데이터 구조이다. 텐서는 머신러닝과 선형대수에서 자주 등장하는 행렬 스타일 계산에 사용하도록 설계된, 계산 지향적 방식으로 구조화된 데이터를 나타낸다.
// 4-D static tensor with 10x10x10x10 elements of type f32
!TensorType1 = tensor<10 x 10 x 10 x 10 x f32>

// 4-D dynamic tensor with N x M x 10 x 10 elements of type f32
!TensorType2 = tensor<? x ? x 10 x 10 x f32>

// dummy example constants
%N = index.constant 2
%M = index.constant 3
%X = arith.constant 42.0 : f32

// allocate a tensor with the shape of the last 2 dimensions
%A = tensor.empty(%N, %M) : tensor<? x ? x 10 x 10 x f32>

// allocate a zero tensor with the shape of the last 2 dimensions
%B = tensor.empty() : tensor<10 x 10 x 10 x 10 x f32>

// create a tensor with the given values
%C = tensor.from_elements %X, %X, %X  : tensor<3xf32>

// Common tensor operations
%D = tensor.extract %A[%N, %M, %N, %M] : !TensorType2
%E = tensor.insert %X into %A[%N, %M, %N, %M] : !TensorType2
텐서 연산은 부작용이 없는(side-effect-free) 깔끔한 방식으로 수학적 변환을 가능하게 하며, 이 덕분에 분석과 최적화가 단순해진다. 예를 들어, 단위행렬은 다음과 같이 표현할 수 있다:
A i j={1 if i=j 0 otherwise
func.func @identity(%m : index, %n : index) {
  %out = tensor.generate %m, %m {
  ^bb0(%i : index, %j : index):
      %ni = arith.index_cast %i : index to i32
      %nj = arith.index_cast %j : index to i32
      %elem = arith.cmpi eq, %ni, %nj : i32
      %elem_i32 = arith.extui %elem : i1 to i32
      tensor.yield %elem_i32 : i32
  } : tensor<?x?xi32>
  return
}
MemRef는 메모리 버퍼를 표현하기 위한 MLIR의 주요 추상화이다. 이는 (NumPy 배열 같은) 고수준 배열 개념과 저수준 메모리 연산 사이를 잇는 다리 역할을 한다. MemRef는 본질적으로 메모리의 한 구역을 가리키는 포인터와, 그 구조에 대한 추가 메타데이터를 함께 표현한다.
MemRef는 여러 핵심 구성요소로 이루어지며, 이는 _메타데이터_와 _데이터_로 나뉜다.
MLIR에서 MemRef 타입은 다음과 같은 문법으로 선언한다:
memref<1024xf32>  // 1D array of 1024 float32 elements
memref<4x4xf64>   // 2D array of 4x4 float64 elements
MLIR MemRef를 사용해 두 배열을 더하는 간단한 예제를 만들어 보자:
module {
  func.func @array_add(%arg0: memref<1024xf32>, %arg1: memref<1024xf32>, %arg2: memref<1024xf32>)
      attributes {llvm.emit_c_interface} {
    %c0 = arith.constant 0 : index
    %c1024 = arith.constant 1024 : index
    %c1 = arith.constant 1 : index

    scf.for %arg3 = %c0 to %c1024 step %c1 {
      %0 = memref.load %arg0[%arg3] : memref<1024xf32>
      %1 = memref.load %arg1[%arg3] : memref<1024xf32>
      %2 = arith.addf %0, %1 : f32
      memref.store %2, %arg2[%arg3] : memref<1024xf32>
    }

    return
  }
}
그 다음 위 MLIR 코드를 실행 파일로 컴파일하려면 다음 명령을 사용할 수 있다:
mlir-opt array_add.mlir \
  -finalize-memref-to-llvm \
  -convert-scf-to-cf \
  -convert-cf-to-llvm \
  -convert-arith-to-llvm \
  -convert-func-to-llvm \
  -o array_add_opt.mlir

mlir-translate array_add_opt.mlir \
  -mlir-to-llvmir \
  -o array_add_opt.ll

llc -filetype=obj --relocation-model=pic arary_add.ll -o arary_add.o
clang -shared -fPIC arary_add.o -o array_add.so
Python과 통합하기 전에, NumPy 배열이 메모리에서 어떻게 배치되는지 이해하는 것이 중요하다:
NumPy 배열을 할당하면, 기본적으로 shape, strides, dtype에 대한 메타데이터와 함께 원시 메모리 버퍼를 감싸는 PyObject 래퍼가 생성된다. 우리는 데이터를 복사하지 않고도 이 메모리를 Python과 JIT 컴파일된 LLVM 로직 사이에서 주고받을 수 있다.
import ctypes
import numpy as np

a = np.array([[1, 2, 3], [4, 5, 6]], dtype=np.float32)
print(a.shape)          # (2, 3)
print(a.strides)        # (12, 4)
print(a.dtype)          # float32
print(a.itemsize)       # 4
print(a.ctypes.data)    # 0x7f926d6e2b20 (base pointer to the memory buffer)

# Get a ctypes pointer
print(a.ctypes.data_as(ctypes.POINTER(ctypes.c_float)))
기본적으로 numpy 배열은 C-contiguous이며, 이는 메모리가 행 우선(row-major) 순서로 배치된다는 뜻이다. 이는 가장 일반적인 메모리 레이아웃이며 대부분의 NumPy 연산에서 기본값이다. 행렬에서 [i, j] 원소의 메모리 주소를 계산하려면 다음 공식을 사용할 수 있다:
address=base_address+(i×strides[0]+j×strides[1])
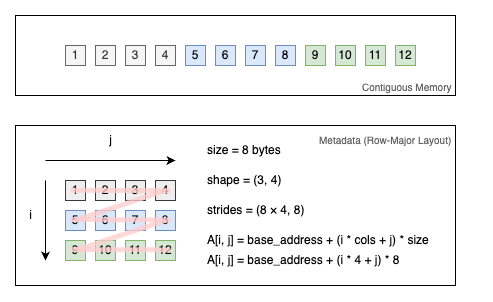 예를 들어,
 memref<3x4xf32>에 대한 행 우선 strided 레이아웃은 다음 두 완전 전개된 memref(서로 동일함)과 같다:
memref<3x4xf32, strided<[4, 1], offset: 0>>
memref<3x4xf32, affine_map<(i, j) -> (i, j)>>
MLIR 코드에서 NumPy 배열을 사용하려면, NumPy의 메모리 레이아웃과 MLIR의 MemRef 구조 사이에 다리를 만들어야 한다. 이를 위해 MLIR의 MemRef 디스크립터 레이아웃과 일치하는 Python 클래스를 만들 수 있다:
import numpy as np
from ctypes import c_void_p, c_longlong, Structure

class MemRefDescriptor(Structure):
    """Structure matching MLIR's MemRef descriptor"""

    _fields_ = [
        ("allocated", c_void_p),  # Allocated pointer
        ("aligned", c_void_p),  # Aligned pointer
        ("offset", c_longlong),  # Offset in elements
        ("shape", c_longlong * 1),  # Array shape (1D in this case)
        ("stride", c_longlong * 1),  # Strides in elements
    ]

def numpy_to_memref(arr):
    """Convert a NumPy array to a MemRef descriptor"""
    if not arr.flags["C_CONTIGUOUS"]:
        arr = np.ascontiguousarray(arr)

    desc = MemRefDescriptor()
    desc.allocated = arr.ctypes.data_as(c_void_p)
    desc.aligned = desc.allocated
    desc.offset = 0
    desc.shape[0] = arr.shape[0]
    desc.stride[0] = 1

    return desc
MemRefDescriptor 클래스는 MLIR이 기대하는 메모리 레이아웃을 그대로 반영한다:
allocated: 할당된 메모리 시작점을 가리킴aligned: 정렬된 메모리를 가리킴(대개 allocated와 동일)offset: 시작점에서 오프셋할 원소 수shape: 배열 차원(예제에서는 1D 배열)stride: 각 차원에서 원소 간 이동 단계numpy_to_memref 함수는 다음 방식으로 변환을 처리한다:
이 변환을 통해, 기반 데이터 복사 없이 NumPy 배열을 MLIR 함수에 전달할 수 있다. 이제 배열 덧셈 예제로 실제 사용법을 보자.
Python에서 MLIR 코드를 사용하는 방법에는 크게 두 가지가 있다. 공유 라이브러리로 컴파일한 뒤 로드하는 방법과, 런타임에 MLIR 코드를 JIT 컴파일하는 방법이다. 배열 덧셈 예제를 통해 두 접근을 모두 살펴보자.
첫 번째 접근은 MLIR 코드를 공유 라이브러리로 컴파일한 뒤, Python에서 ctypes로 로드하는 방식이다. 이를 위해서는 MLIR 코드를 미리 컴파일해야 한다:
# Compile MLIR to shared library
mlir-opt array_add.mlir \
  --convert-tensor-to-linalg \
  --convert-linalg-to-loops \
  --convert-scf-to-cf \
  --convert-cf-to-llvm \
  --convert-math-to-llvm \
  --convert-arith-to-llvm \
  --convert-func-to-llvm \
  --convert-index-to-llvm \
  --finalize-memref-to-llvm \
  --reconcile-unrealized-casts \
  -o array_add_opt.mlir

mlir-translate --mlir-to-llvmir array_add_opt.mlir > array_add.ll
llc -filetype=obj array_add.ll -o array_add.o
clang -shared -fPIC array_add.o -o libarray_add.dylib
그 다음 컴파일된 라이브러리를 Python에서 로드해 사용할 수 있다:
import ctypes
import numpy as np
from np_memref import MemRefDescriptor, numpy_to_memref

def main():
    # Load the shared library
    lib = ctypes.CDLL("./libarray_add.dylib")

    # Get the C interface function
    array_add = lib._mlir_ciface_array_add
    array_add.argtypes = [
        ctypes.POINTER(MemRefDescriptor)
    ] * 3  # input1, input2, output
    array_add.restype = None

    # Create sample input arrays
    size = 1024
    a = np.ones(size, dtype=np.float32)
    b = np.ones(size, dtype=np.float32) * 2
    c = np.zeros(size, dtype=np.float32)

    # Convert arrays to MemRef descriptors
    a_desc = numpy_to_memref(a)
    b_desc = numpy_to_memref(b)
    c_desc = numpy_to_memref(c)

    # Call the function
    array_add(ctypes.byref(a_desc), ctypes.byref(b_desc), ctypes.byref(c_desc))

    # Verify results
    expected = a + b
    np.testing.assert_array_almost_equal(c, expected)
    print("Array addition successful!")
    print(f"First few elements: {c[:5]}")  # Should show [3.0, 3.0, 3.0, 3.0, 3.0]

if __name__ == "__main__":
    main()
이 접근은 더 단순하며, 컴파일을 미리 수행하므로 프로덕션 사용에 더 적합하다. 컴파일된 라이브러리는 Python 패키지와 함께 배포할 수 있고 런타임에 로드하면 된다.
두 번째 접근은 llvmlite(LLVM에 대한 Python 바인딩)를 사용해 런타임에 MLIR 코드를 JIT 컴파일하는 방식이다. 이 방식은 런타임에 MLIR 코드를 생성하거나 수정할 수 있으므로 더 유연하다:
import os
import subprocess
import numpy as np
from ctypes import CFUNCTYPE, POINTER
from np_memref import MemRefDescriptor, numpy_to_memref

import llvmlite

# Disable typed pointers for LLVM 15+ compatibility
llvmlite.opaque_pointers_enabled = True

import llvmlite.binding as llvm  # noqa: E402

# Initialize LLVM
llvm.initialize()
llvm.initialize_native_target()
llvm.initialize_native_asmprinter()

def compile_mlir_to_llvm(mlir_file_path):
    """Compile MLIR code to LLVM IR using mlir-opt and mlir-translate"""
    # Run mlir-opt to lower to LLVM dialect
    opt_cmd = [
        "mlir-opt",
        mlir_file_path,
        "--convert-tensor-to-linalg",
        "--convert-linalg-to-loops",
        "--convert-scf-to-cf",
        "--convert-cf-to-llvm",
        "--convert-math-to-llvm",
        "--convert-arith-to-llvm",
        "--convert-func-to-llvm",
        "--convert-index-to-llvm",
        "--finalize-memref-to-llvm",
        "--reconcile-unrealized-casts",
    ]

    try:
        opt_result = subprocess.run(opt_cmd, capture_output=True, text=True, check=True)
    except subprocess.CalledProcessError as e:
        print("Error running mlir-opt:")
        print("STDOUT:", e.stdout)
        print("STDERR:", e.stderr)
        raise

    # Run mlir-translate to convert to LLVM IR
    translate_cmd = ["mlir-translate", "--mlir-to-llvmir"]
    try:
        translate_result = subprocess.run(
            translate_cmd,
            input=opt_result.stdout,
            capture_output=True,
            text=True,
            check=True,
        )
    except subprocess.CalledProcessError as e:
        print("Error running mlir-translate:")
        print("STDOUT:", e.stdout)
        print("STDERR:", e.stderr)
        raise

    return translate_result.stdout

def create_execution_engine():
    """Create an ExecutionEngine suitable for JIT"""
    target = llvm.Target.from_default_triple()
    target_machine = target.create_target_machine()
    backing_mod = llvm.parse_assembly("")
    engine = llvm.create_mcjit_compiler(backing_mod, target_machine)
    return engine

def compile_and_load_mlir(mlir_file_path):
    """Compile MLIR code and load it into a JIT engine"""
    # Convert MLIR to LLVM IR
    llvm_ir = compile_mlir_to_llvm(mlir_file_path)

    # Create module from LLVM IR
    mod = llvm.parse_assembly(llvm_ir)
    mod.verify()

    # Create execution engine and add module
    engine = create_execution_engine()
    engine.add_module(mod)
    engine.finalize_object()

    return engine, mod

def main():
    # Get path to MLIR file
    current_dir = os.path.dirname(os.path.abspath(__file__))
    mlir_file = os.path.join(current_dir, "array_add.mlir")

    # Compile and load the MLIR code
    engine, mod = compile_and_load_mlir(mlir_file)

    # Get function pointer to the compiled function
    func_ptr = engine.get_function_address("_mlir_ciface_array_add")

    # Create the ctypes function wrapper
    array_add = CFUNCTYPE(
        None,
        POINTER(MemRefDescriptor),
        POINTER(MemRefDescriptor),
        POINTER(MemRefDescriptor),
    )(func_ptr)

    # Create test arrays
    size = 1024
    a = np.ones(size, dtype=np.float32)
    b = np.ones(size, dtype=np.float32) * 2
    c = np.zeros(size, dtype=np.float32)

    # Convert arrays to MemRef descriptors
    a_desc = numpy_to_memref(a)
    b_desc = numpy_to_memref(b)
    c_desc = numpy_to_memref(c)

    # Call the JIT-compiled function
    array_add(a_desc, b_desc, c_desc)

    # Verify results
    expected = a + b
    np.testing.assert_array_almost_equal(c, expected)
    print("Array addition successful!")
    print(f"First few elements: {c[:5]}")  # Should show [3.0, 3.0, 3.0, 3.0, 3.0]

if __name__ == "__main__":
    main()
JIT 컴파일 접근은 몇 가지 장점을 제공한다. 첫째, 런타임에 MLIR 코드를 생성하거나 수정할 수 있다. 둘째, 별도의 컴파일된 라이브러리를 관리할 필요가 없다. 마지막으로, 런타임에 특정 CPU 아키텍처에 맞춘 최적화를 수행할 수 있다. 하지만 단점도 있다. 시작 시점에 컴파일 오버헤드가 있고, MLIR 도구 의존성을 포함한 설정이 더 복잡하며, 런타임에 컴파일 오류를 처리해야 한다.
고수준 MLIR 구성요소 외에도, MLIR은 메모리 레이아웃과 연산을 더 직접적으로 제어할 수 있는 저수준 LLVM dialect를 제공한다. LLVM dialect의 struct를 사용하면 MLIR에서 커스텀 타입을 만들 수 있다. 예를 들어 C에서는 다음과 같이 작성한다:
struct Pair {
  int a;
  float b;
};
MLIR에서는 동일한 struct를 다음과 같이 정의할 수 있다:
!Pair = !llvm.struct<(i32, f32)>
%1 = llvm.mlir.zero : !Pair
이는 두 필드(i32와 f32)를 갖는 struct인 새로운 타입 별칭 !Pair를 만든다. 그리고 %1 변수는 모든 필드가 0으로 초기화된 이 struct의 인스턴스이다.
LLVM 배열은 원소들의 고정 크기 순차 저장을 제공한다. 다음 문법으로 만들 수 있다:
// Array of 10 integers
!IntArray = !llvm.array<10 x i32>

// Array of 4 pairs (using the struct defined above)
!PairArray = !llvm.array<4 x !Pair>

// Create and initialize an array
%arr = llvm.mlir.constant(dense<[1, 2, 3, 4]> : tensor<4xi32>) : !llvm.array<4 x i32>

// Access array elements
%idx = llvm.mlir.constant(2 : i32) : i32
%element = llvm.extractvalue %arr[2] : !llvm.array<4 x i32>

// Update array elements
%new_arr = llvm.insertvalue %element, %arr[0] : !llvm.array<4 x i32>
MemRef 같은 고수준 MLIR 구성요소와 달리 LLVM 배열은 더 엄격하며 C의 배열 동작을 더 가깝게 반영한다. 컴파일 타임에 고정된 크기를 가지며, 구조에 대한 어떤 메타데이터도 함께 들고 다니지 않는다.
MLIR의 vector dialect는 SIMD(Single Instruction, Multiple Data) 연산을 위한 저수준 추상화를 제공한다. 이는 하드웨어 벡터 기능과 밀접하게 정렬되어 있지만, LLVM의 벡터 연산 로워링 및 최적화 능력 덕분에 타깃 아키텍처가 지원하는 것에 엄격히 제한되지는 않는다.
MLIR의 벡터는 다음이 될 수 있다:
// Single-dimensional vectors
vector<4xf32>     // 4-element vector of float32
vector<8xi32>     // 8-element vector of int32

// Multi-dimensional vectors
vector<2x4xf32>   // 2x4 matrix of float32 as vectors
vector<2x2x4xf32> // 3D vector arrangement
MLIR은 하드웨어 명령으로 효율적으로 매핑되는 벡터 연산을 제공한다:
// Vector arithmetic
%c = vector.add %a, %b : vector<4xf32>
%d = vector.mul %a, %b : vector<4xf32>

// Vector shuffles and extracts
%e = vector.extract %c[0] : vector<4xf32>
%f = vector.shuffle %c, %d [0, 1, 4, 5] : vector<4xf32>, vector<4xf32>

// Vector fold/reduction operations
%sum = vector.reduction <add>, %c : vector<4xf32> into f32
MLIR의 vector dialect는 하드웨어 능력에 직접 대응하지 않을 수 있는 연산도 제공하지만, LLVM이 로워링 과정에서 이를 처리한다. 예를 들어 AVX, NEON 같은 하드웨어 벡터로 직접 매핑하거나, 더 작은 벡터로 분할하거나, 필요 시 스칼라화(scalarization)한다.
예를 들어 vector<8xf32> 연산은 x86에서는 AVX로 직접 매핑될 수 있고, ARM에서는 두 개의 NEON 연산으로 쪼개질 수 있으며, 벡터 지원이 없는 아키텍처에서는 스칼라화될 수 있다.
MLIR에서 버퍼화(bufferization)는 텐서 시맨틱을 가진 op를 memref 시맨틱을 가진 op로 변환하는 과정이다. 즉, 수학적 텐서 구성 위에서의 계산을 물리적 메모리 버퍼 위에서의 계산으로 바꾸는 것이다.
텐서를 memref로 바꾸는 데 사용되는 두 가지 저수준 연산이 있다. 이름 그대로 동작한다.
bufferization.to_memref - 텐서를 memref로 변환bufferization.to_tensor - memref를 텐서로 변환%out1 = bufferization.to_memref %result : tensor<10xf32> to memref<10xf32>
%out2 = bufferization.to_tensor %result : memref<10xf32> to tensor<10xf32>
bufferization.materialize_in_destination 연산은 목적지 버퍼에서 텐서를 memref로 변환하는 데 사용된다. 이는 텐서를 memref로 변환한 뒤 목적지 버퍼에 저장하는 것과 동등하지만, 중간 단계를 거치지 않는다. 이는 외부에서 할당된 버퍼를 사용하는 커널의 마지막 단계로 자주 쓰인다.
bufferization.materialize_in_destination %0 in restrict writable %C : (tensor<10xf32>, memref<10xf32>) -> ()
또한 이 변환을 자동으로 수행하는 패스들도 있다. one-shot-bufferize 패스는 모든 텐서 연산을 memref 연산으로 변환하는 데 사용할 수 있다. 중요한 점은 기본 설정으로는 함수 경계(즉 함수의 입력과 출력)를 버퍼화하지 않으므로, bufferize-function-boundaries 플래그를 패스에 추가해야 한다.
mlir-opt -one-shot-bufferize="bufferize-function-boundaries"
간단한 예제는 변환을 잘 보여준다:
// Before bufferization
func.func @example(%arg0: tensor<8xf32>, %idx: index) -> tensor<8xf32> {
  %f = arith.constant 5.000000e+00 : f32
  %result = tensor.insert %f into %arg0[%idx] : tensor<8xf32>
  return %result : tensor<8xf32>
}

// After bufferization
func.func @example(%arg0: memref<8xf32>, %idx: index) -> memref<8xf32> {
  %f = arith.constant 5.000000e+00 : f32
  memref.store %f, %arg0[%idx] : memref<8xf32>
  return %arg0 : memref<8xf32>
}
이 경우 텐서 insert 연산은 인플레이스(in-place)로 버퍼화될 수 있었고, 출력에 입력 버퍼를 재사용했다.
C에서 함수를 호출하려면 C 호환 래퍼를 방출해야 한다. 이는 llvm.emit_c_interface 속성을 사용해 수행한다. 일반적으로 함수를 버퍼화하면 memref의 모든 필드를 개별 인자로 펼쳐(unroll) 단일 인자 목록으로 만든다. 하지만 C에서 함수를 호출할 때는 보통 memref를 struct에 대한 void 포인터로 전달하므로, 이런 방식은 바람직하지 않다.
func.func @add_vector_to_matrix(%A: memref<3xf32>) -> memref<3xf32> attributes {llvm.emit_c_interface} {
  return %A : memref<3xf32>
}
이는 함수에 대한 C 호환 래퍼를 방출하며, 결과적으로 두 개의 함수로 확장된다.
module {
  llvm.func @fun(%arg0: !llvm.ptr, %arg1: !llvm.ptr, %arg2: i64, %arg3: i64, %arg4: i64) -> !llvm.struct<(ptr, ptr, i64, array<1 x i64>, array<1 x i64>)> attributes {llvm.emit_c_interface} {
    %0 = llvm.mlir.poison : !llvm.struct<(ptr, ptr, i64, array<1 x i64>, array<1 x i64>)>
    %1 = llvm.insertvalue %arg0, %0[0] : !llvm.struct<(ptr, ptr, i64, array<1 x i64>, array<1 x i64>)>
    %2 = llvm.insertvalue %arg1, %1[1] : !llvm.struct<(ptr, ptr, i64, array<1 x i64>, array<1 x i64>)>
    %3 = llvm.insertvalue %arg2, %2[2] : !llvm.struct<(ptr, ptr, i64, array<1 x i64>, array<1 x i64>)>
    %4 = llvm.insertvalue %arg3, %3[3, 0] : !llvm.struct<(ptr, ptr, i64, array<1 x i64>, array<1 x i64>)>
    %5 = llvm.insertvalue %arg4, %4[4, 0] : !llvm.struct<(ptr, ptr, i64, array<1 x i64>, array<1 x i64>)>
    llvm.return %5 : !llvm.struct<(ptr, ptr, i64, array<1 x i64>, array<1 x i64>)>
  }
  llvm.func @_mlir_ciface_fun(%arg0: !llvm.ptr, %arg1: !llvm.ptr) attributes {llvm.emit_c_interface} {
    %0 = llvm.load %arg1 : !llvm.ptr -> !llvm.struct<(ptr, ptr, i64, array<1 x i64>, array<1 x i64>)>
    %1 = llvm.extractvalue %0[0] : !llvm.struct<(ptr, ptr, i64, array<1 x i64>, array<1 x i64>)>
    %2 = llvm.extractvalue %0[1] : !llvm.struct<(ptr, ptr, i64, array<1 x i64>, array<1 x i64>)>
    %3 = llvm.extractvalue %0[2] : !llvm.struct<(ptr, ptr, i64, array<1 x i64>, array<1 x i64>)>
    %4 = llvm.extractvalue %0[3, 0] : !llvm.struct<(ptr, ptr, i64, array<1 x i64>, array<1 x i64>)>
    %5 = llvm.extractvalue %0[4, 0] : !llvm.struct<(ptr, ptr, i64, array<1 x i64>, array<1 x i64>)>
    %6 = llvm.call @fun(%1, %2, %3, %4, %5) : (!llvm.ptr, !llvm.ptr, i64, i64, i64) -> !llvm.struct<(ptr, ptr, i64, array<1 x i64>, array<1 x i64>)>
    llvm.store %6, %arg0 : !llvm.struct<(ptr, ptr, i64, array<1 x i64>, array<1 x i64>)>, !llvm.ptr
    llvm.return
  }
}
대신 이제 @fun 함수에 대한 C 호환 래퍼인 @_mlir_ciface_fun 함수를 호출한다. 입력(%arg0)과 출력(%arg1)을 위해 두 개의 인자를 받는 것에 주목하라. 이제 우리는 함수에 우리 자신의 메모리 버퍼를 전달할 수 있고, 함수는 결과를 다시 우리 버퍼에 기록할 것이다. 코드 생성이 memref에서 메타데이터를 추출해 사용한다.