egglog 라이브러리를 사용해 Python 표현식에 대해 항 등가 포화(equality saturation) 기반의 재작성과 최적화를 수행하고, 이를 MLIR로 컴파일하는 장난감 컴파일러 파이프라인을 살펴본다.

우리는 수치 계산을 최적화하기 위해 점점 더 정교한 기법들을 살펴왔다. 기본 MLIR 개념에서 시작해 메모리 관리와 선형대수, 그리고 신경망 구현까지 다뤘다. 각 층은 계산을 표현하고 최적화하는 새로운 능력을 더해 왔다. 이제 Python 표현식을 위한 첫 번째 장난감 컴파일러를 만들 준비가 되었다.
이 절에서는 egglog 라이브러리를 사용해 Python 표현식에 대해 항 재작성(term rewriting)과 최적화를 수행하고, 이를 MLIR로 컴파일하는 방법을 살펴본다.
이 절의 전체 소스 코드는 GitHub에서 확인할 수 있다.
구현으로 들어가기 전에, 등가 포화(equality saturation)와 e-graph의 핵심 개념을 다시 정리해 보자.
예로 다음과 같은 재작성 규칙이 있다고 하자.
x * 2 → x << 1x*y/x → y그리고 이를 표현식 (a * 2)/2에 적용하려고 하면 (a << 1)/2가 된다. 하지만 분자와 분모의 2를 약분해서 a를 얻었어야 하며, 이것이 더 단순한 표현식이다. 재작성의 적용 순서는 중요하며, 비용 함수(cost function)에 따라 표현식을 더 단순한 형태로 줄이는 최적의 재작성 순서를 찾고 싶다. 이를 _phase ordering problem_이라고 한다.
egg 라이브러리는 e-graph를 사용하여 표현식에 적용 가능한 모든 재작성을 철저히(exhaustively) 적용하는 접근을 취함으로써 phase ordering problem을 사실상 해결한다. 이 접근은 가능한 모든 재작성을 탐색한 뒤, 그중 가장 최적인 형태를 추출(extraction)할 수 있게 해준다.
선형대수의 경우를 생각해보면, NumPy의 전치(transpose), 곱셈 같은 행렬 연산은 행렬의 모든 원소를 만져야 하기 때문에 비용이 꽤 크다. 하지만 연산 수를 줄이기 위해 적용할 수 있는 다양한 항등식의 범위가 존재한다.
LLVM 같은 컴파일러나 MLIR의 linalg 방언(dialect)조차도 이런 항등식을 알지 못하기 때문에, 재작성을 적용해서 비싼 연산을 추상화해 제거할 수 있다고 장담할 수는 없다. 하지만 높은 수준(우리의 코어 언어)에서는 e-graph를 사용해 MLIR로 내리기(lowering) 전에 훨씬 더 효율적인 텐서 조작 연산을 만들어낼 수 있다.
예를 들어, 다음과 같은 항등식은 선형대수에서 꽤 흔하다:
(A B)T=B T A T
(A T)T=A
또는 Python으로 쓰면:
np.transpose(A * B) = np.transpose(B) * np.transpose(A)
np.transpose(np.transpose(A)) == A
이 규칙들을 적용하면 NumPy 표현식을 컴파일 타임에 최적화할 수 있어 성능이 크게 향상될 수 있다. 예컨대 위 예시에서는 곱셈 1회와 전치 2회로 이루어진 세 개의 루프를, 곱셈 1회와 전치 1회로 이루어진 두 개의 루프로 줄이는 데 성공했다. 이 최적화는 계산을 단순화할 뿐 아니라 효율도 높인다. NumPy의 일반적인 사용에서는 이런 최적화 기회가 많이 존재하며, 흔히 low-hanging fruit로 불린다. 이런 최적화는 필요한 연산 수를 줄이도록 체계적으로 적용할 수 있어 수치 계산의 실행을 더 간소화한다. 특히 LLVM의 자동 벡터화(auto-vectorization)가 동작하기 전 단계에서부터 이점을 제공하므로, 표현식의 잠재력을 최대한 활용해 더 빠른 실행 시간을 얻을 수 있다.
e-graph(equality graph)는 서로 동등한 많은 표현식을 압축적으로 표현하는 데이터 구조다. 표현식을 단일 정규형(canonical form)으로 유지하는 대신, e-graph는 동등한 표현식들의 클래스(class)를 유지한다. 이 접근은 더 유연하고 효율적인 항 재작성을 가능하게 한다.
egglog 라이브러리로 기본적인 단순화를 수행하는 구체적인 예를 보자. 먼저 표현식 모델을 정의해야 한다.
from __future__ import annotations
from egglog import *

class Num(Expr):
    def __init__(self, value: i64Like) -> None: ...

    @classmethod
    def var(cls, name: StringLike) -> Num: ...

    def __add__(self, other: Num) -> Num: ...

    def __mul__(self, other: Num) -> Num: ...

# Create an e-graph to store our expressions
egraph = EGraph()

# Define our expressions and give them names in the e-graph
expr1 = egraph.let("expr1", Num(2) * (Num.var("x") + Num(3)))  # 2 * (x + 3)
expr2 = egraph.let("expr2", Num(6) + Num(2) * Num.var("x"))    # 6 + 2x

# Define our rewrite rules using a decorated function
@egraph.register
def _num_rule(a: Num, b: Num, c: Num, i: i64, j: i64):
    yield rewrite(a + b).to(b + a)                    # Commutativity of addition
    yield rewrite(a * (b + c)).to((a * b) + (a * c))  # Distributive property
    yield rewrite(Num(i) + Num(j)).to(Num(i + j))     # Constant folding for addition
    yield rewrite(Num(i) * Num(j)).to(Num(i * j))     # Constant folding for multiplication

# Apply rules until no new equalities are found
egraph.saturate()

# Check if expr1 and expr2 are equivalent
egraph.check(eq(expr1).to(expr2))

# Extract the simplified form of expr1
egraph.extract(expr1)
egraph.display() 함수를 사용하면 e-graph를 시각화할 수 있다.
등가 포화 이전의 입력 표현식:
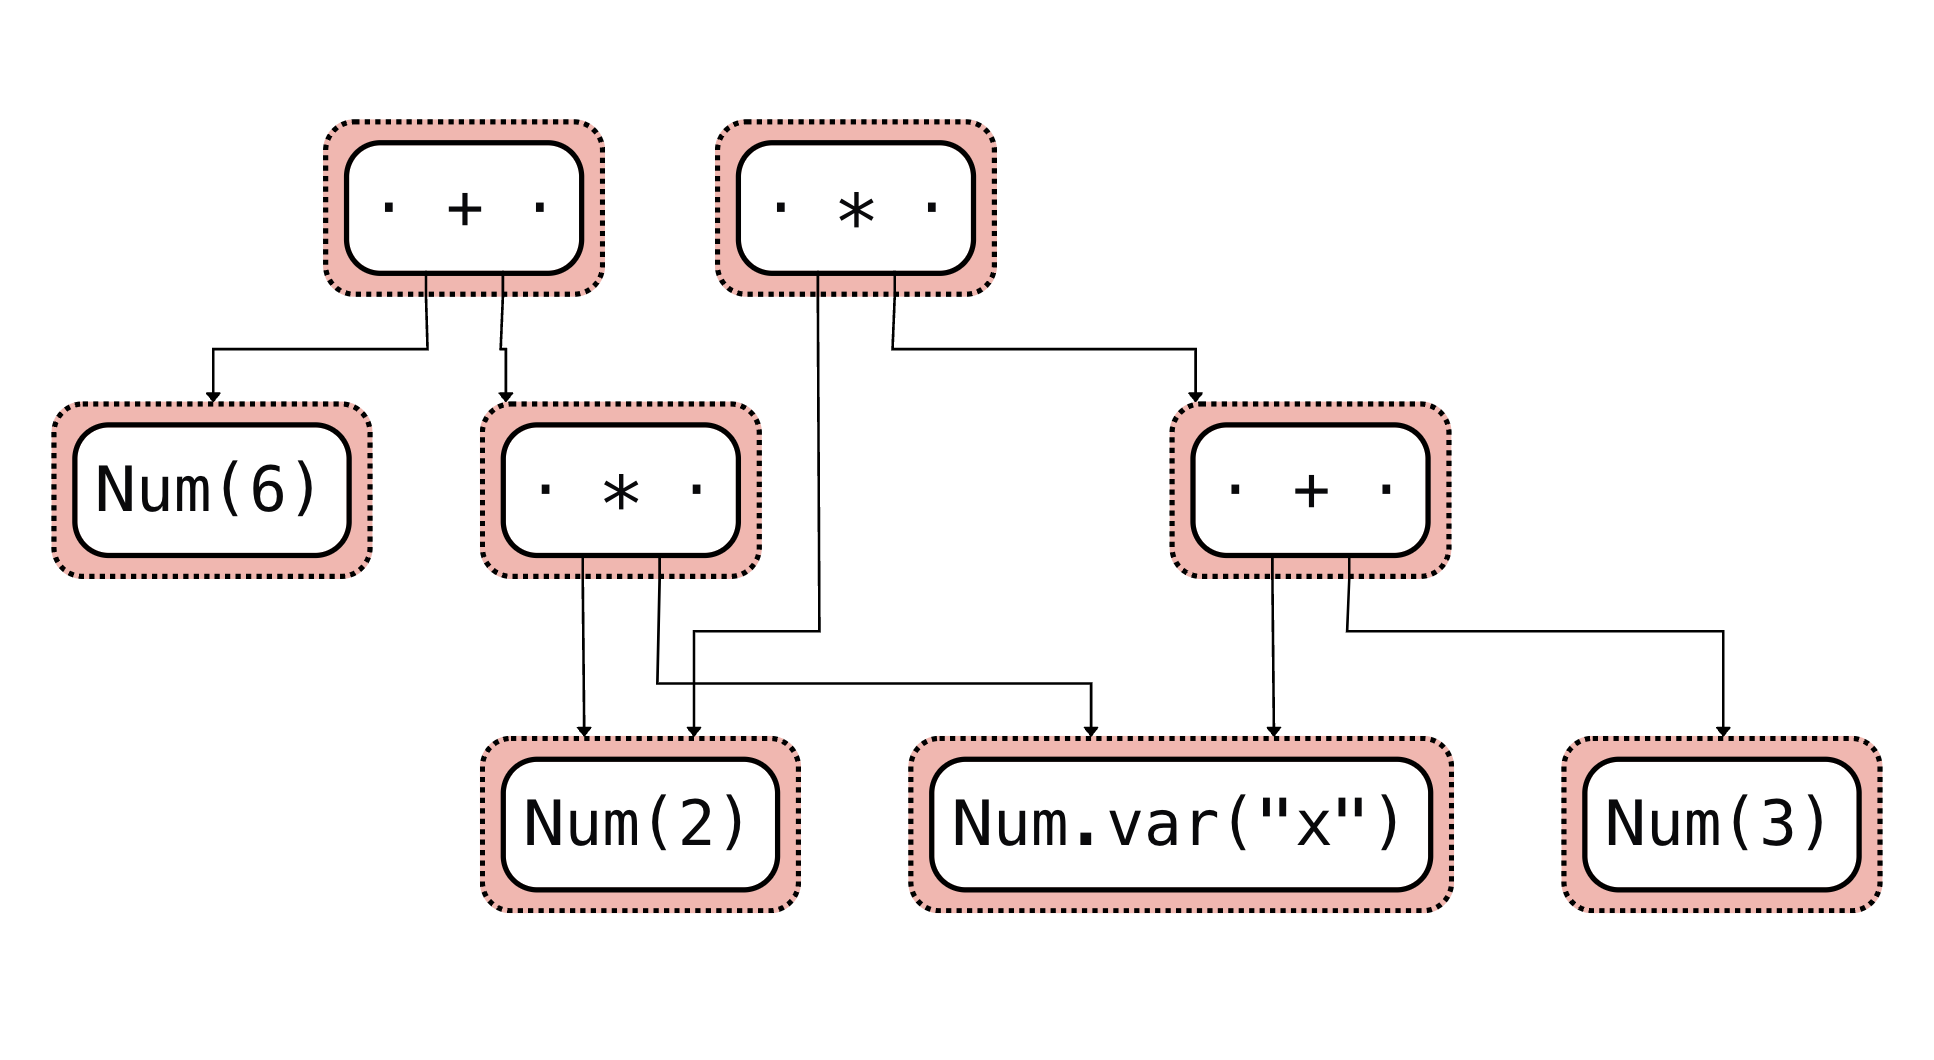 등가 포화 이전의 입력 표현식
출력에서는 모든 등가 클래스가 표현식들의 네트워크로 나타난다:
등가 포화 이전의 입력 표현식
출력에서는 모든 등가 클래스가 표현식들의 네트워크로 나타난다:
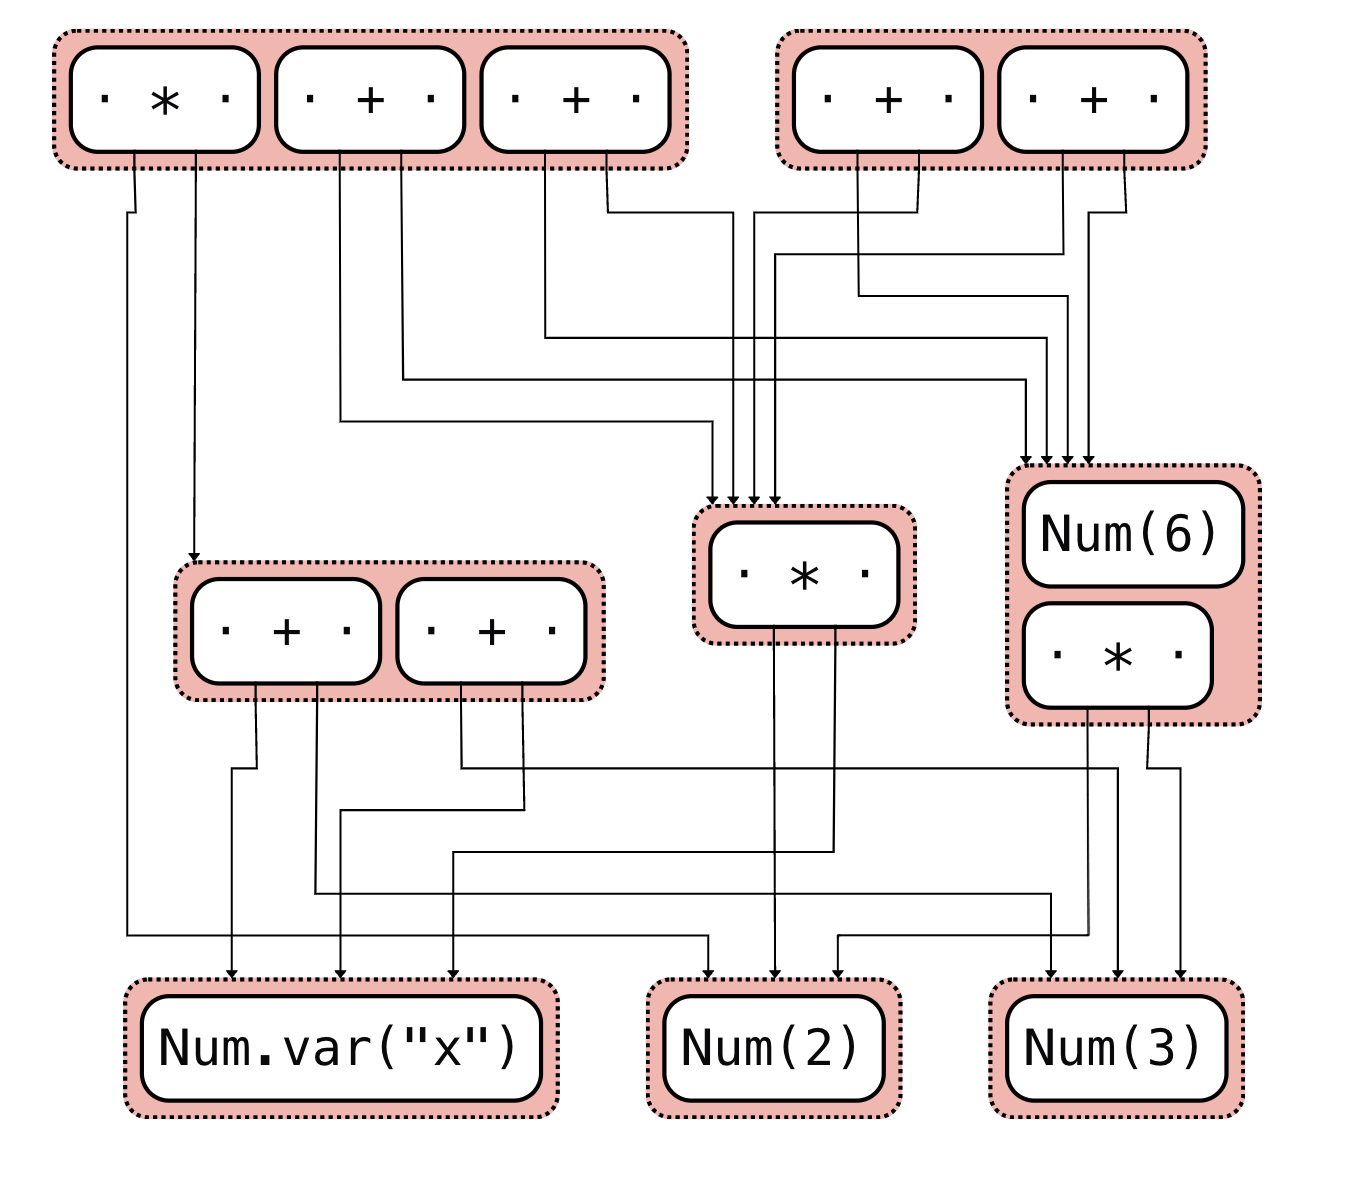 등가 포화 이후의 출력 표현식
그 다음에는 사용자 정의 비용 함수에 따라 원하는 표현식을 추출할 수 있다.
등가 포화 이후의 출력 표현식
그 다음에는 사용자 정의 비용 함수에 따라 원하는 표현식을 추출할 수 있다.
이제 이를 기본 표현식 컴파일러에 적용해 보자. 우리의 컴파일러 파이프라인은 다음과 같은 핵심 단계들로 구성된다:
컴파일러의 파운데이션 레이어는 수학 표현식을 표현하고 조작하기 위한 핵심 추상화를 제공한다. 이 레이어는 이후의 모든 고수준 최적화와 변환의 기반이 되므로 매우 중요하다. 각 구성 요소를 자세히 살펴보자.
expr_model.py)컴파일러의 중심에는 수학 표현식을 추상 구문 트리(AST)로 표현하는 표현식 모델이 있다. 이 모델은 Python의 dataclasses를 사용해 깔끔하고 효율적으로 구현된다.
모든 표현식의 기반 클래스는 Expr 클래스이며, 기본 연산을 제공한다:
@dataclass(frozen=True)
class Expr:
    def __add__(self, other: Expr) -> Expr:
        return Add(self, as_expr(other))

    def __mul__(self, other: Expr) -> Expr:
        return Mul(self, as_expr(other))
    # ... other operations
표현식 모델은 세 가지 기본 타입으로 구성된다:
@dataclass(frozen=True)
class FloatLiteral(Expr):
    fval: float  # Floating-point constant

@dataclass(frozen=True)
class IntLiteral(Expr):
    ival: float  # Integer constant
@dataclass(frozen=True)
class Symbol(Expr):
    name: str  # Variable or function name
@dataclass(frozen=True)
class UnaryOp(Expr):
    operand: Expr  # Single operand

@dataclass(frozen=True)
class BinaryOp(Expr):
    lhs: Expr  # Left-hand side
    rhs: Expr  # Right-hand side
@dataclass(frozen=True)
class Add(BinaryOp): pass      # Addition
...

@dataclass(frozen=True)
class Sin(UnaryOp): pass       # Sine
builtin_functions.py)내장 함수 모듈은 수학 연산을 위한 NumPy 유사 인터페이스를 제공한다. 이를 통해 사용자는 익숙한 문법으로 표현식을 작성하면서도, 우리의 최적화 프레임워크를 활용할 수 있다. 또한 흔한 수학 상수와 절댓값 같은 연산을 위한 헬퍼 함수를 포함한다.
# A mock NumPy namespace that we convert into our own expression model

import math
from mlir_egglog.expr_model import (
    sin,
    cos,
    tan,
    asin,
    acos,
    atan,
    tanh,
    sinh,
    cosh,
    sqrt,
    exp,
    log,
    log10,
    log2,
    float32,
    int64,
    maximum,
)  # noq

# Constants
e = math.e
pi = math.pi

# Define abs function
def abs(x):
    return maximum(x, -x)

def relu(x):
    return maximum(x, 0.0)

def sigmoid(x):
    return 1.0 / (1.0 + exp(-x))

__all__ = [
    "sin",
    "cos",
    "tan",
    "asin",
    "acos",
    "atan",
    "tanh",
    "sinh",
    "cosh",
    "sqrt",
    "exp",
    "log",
    "log10",
    "log2",
    "float32",
    "int64",
    "e",
    "pi",
    "maximum",
    "abs",
]
term_ir.py)Term IR 레이어는 항 재작성과 등가 포화에 최적화된 중간 표현(IR)을 제공한다. Term IR의 핵심 기능 중 하나는 다양한 연산에 대한 비용 모델이다:
COST_BASIC_ARITH = 1   # Basic arithmetic (single CPU instruction)
COST_CAST = 2          # Type conversion operations
COST_DIV = 5           # Division
COST_POW_INTEGER = 10  # Integer power
COST_SQRT = 20         # Square root
COST_LOG = 30          # Logarithm
COST_EXP = 40          # Exponential
COST_POW = 50          # General power operation
COST_TRIG_BASIC = 75   # Basic trigonometric functions
COST_HYPERBOLIC = 180  # Hyperbolic functions
이 비용들은 e-graph 최적화 엔진이 어떤 변환을 적용할지 결정하는 데 사용된다. 비용 값은 현대 하드웨어에서 각 연산의 계산 복잡도를 대략 반영한다.
from __future__ import annotations

import egglog
from egglog import StringLike, i64, f64, i64Like, f64Like  # noqa: F401
from egglog import RewriteOrRule, rewrite
from typing import Generator
from mlir_egglog.expr_model import Expr, FloatLiteral, Symbol, IntLiteral
from abc import abstractmethod

def as_egraph(expr: Expr) -> Term:
    """
    Convert a syntax tree expression to an egraph term.
    """
    from mlir_egglog import expr_model

    match expr:
        # Literals and Symbols
        case FloatLiteral(fval=val):
            return Term.lit_f32(val)
        case IntLiteral(ival=val):
            return Term.lit_i64(int(val))
        case Symbol(name=name):
            return Term.var(name)

        # Binary Operations
        case expr_model.Add(lhs=lhs, rhs=rhs):

        # Rest of the operations
        ...
비용 모델은 e-graph 최적화 엔진이 우리의 비용 모델에 따라 가장 비용 효율적인 구현을 찾도록 유도하는 데 사용된다. 예를 들어
e x⋅e x⋅e x=e 3 x
좌변은 곱셈 3회이고 우변은 곱셈 1회다. 따라서 추출(extraction)에 적용되는 비용은 우변을 선택하게 된다.
우리 컴파일러의 가장 강력한 기능 중 하나는 Python 함수를 기호적으로 해석(symbolically interpret)할 수 있다는 점이다. 이 과정은 일반 Python 함수를 IR 표현으로 변환하여, 결과 표현식 트리에 최적화를 적용할 수 있게 해준다.
해석 과정은 interpret 함수가 처리한다:
import types
import inspect

from mlir_egglog import expr_model as ir

def interpret(fn: types.FunctionType, globals: dict[str, object]):
    """
    Symbolically interpret a python function.
    """
    # Get the function's signature
    sig = inspect.signature(fn)

    # Create symbolic parameters for each of the function's arguments
    params = [n for n in sig.parameters]
    symbolic_params = [ir.Symbol(name=n) for n in params]

    # Bind the symbolic parameters to the function's arguments
    ba = sig.bind(*symbolic_params)

    # Inject our globals (i.e. np) into the function's globals
    custom_globals = fn.__globals__.copy()
    custom_globals.update(globals)

    # Create a temporary function with our custom globals
    tfn = types.FunctionType(
        fn.__code__,
        custom_globals,
        fn.__name__,
        fn.__defaults__,
        fn.__closure__,
    )
    return tfn(*ba.args, **ba.kwargs)
이 함수는 먼저 입력 함수의 시그니처를 분석하여 파라미터를 결정한다. 각 파라미터에 대해 Symbol 클래스를 이용해 기호적 표현을 만든다. 이 심볼은 표현식 트리를 따라가며 변수를 추적하는 데 사용된다.
다음으로 기호적 파라미터를 함수의 인자 슬롯에 바인딩하여, 파라미터 이름과 기호적 표현 사이의 매핑을 만든다. 이어서 NumPy 함수 같은 수학 연산의 사용자 정의 구현을 함수의 전역 네임스페이스에 주입한다. 이를 통해 해당 함수 호출을 가로채(intercept) 기호적 연산으로 치환할 수 있다.
수정된 globals를 가진 임시 함수를 만들되, 원래 함수의 코드, 이름, 클로저는 그대로 유지한다. 마지막으로 기호적 파라미터로 함수를 실행하면 계산을 나타내는 표현식 트리가 생성된다.
예를 들어 다음 Python 함수가 있다고 하자:
def f(x, y):
    return np.sin(x) + np.cos(y)
해석 과정은 다음을 수행한다:
x, y에 대한 심볼 생성np.sin, np.cos를 기호적 버전으로 대체Sin(Symbol("x")) + Cos(Symbol("y"))를 나타내는 표현식 트리 반환이 기호적 해석 덕분에 Python 계산을 e-graph 메커니즘으로 최적화 가능한 형태로 포착할 수 있다.
ir_to_mlir.py)IR에서 MLIR로의 변환 레이어는 고수준 표현식 표현과 MLIR의 저수준 방언 사이를 잇는 중요한 다리 역할을 한다. 이 변환 과정은 ir_to_mlir.py에 구현되어 있으며, Python의 동적 실행 능력과 AST 조작을 함께 활용하는 여러 단계를 포함한다.
변환 파이프라인은 convert_term_to_expr 함수로 시작하며, IR term을 내부 표현식 모델로 변환한다. 이 함수는 Python의 내장 ast 모듈을 사용해 term의 추상 구문 트리를 파싱하고 조작한다. 흥미로운 점은 Python 실행 환경 자체를 변환 과정의 일부로 활용한다는 것이다.
term이 변환에 들어오면 먼저 AST 파싱을 거친다. 함수는 term의 문자열 표현을 바탕으로 Python AST를 생성하며, 이를 통해 실행 전에 코드 구조를 조작할 수 있다. 이 과정의 핵심은 mangle_assignment 함수로, 표현식의 결과가 _out이라는 변수에 제대로 담기도록 보장한다. 이 맹글링 단계는 실행 환경에서 최종 결과를 꺼낼 수 있게 해주므로 매우 중요하다.
실행 환경은 각 연산 이름을 대응 구현으로 매핑하는 function_map 딕셔너리로 신중하게 구성된다. 이 매핑에는 기본 산술 연산(Add, Sub, Mul, Div), 수학 함수(Sin, Cos, Exp, Log), 타입 변환(CastF32, CastI64)이 포함된다. 각 연산은 표현식 모델의 메서드 또는 내장 함수 모듈의 함수로 연결된다.
두 번째 핵심 구성 요소는 convert_term_to_mlir 함수로, 변환된 표현식을 받아 MLIR 코드를 생성한다. 이 함수는 MLIR의 텍스트 형식으로 최종 변환을 처리한다. argspec 파라미터를 통해 함수 인자를 처리하면서 인자 이름을 MLIR 표현으로 매핑한다(예: x를 %arg_x로 변환). 실제 MLIR 생성은 MLIRGen 클래스가 맡으며, 표현식 트리를 순회하며 대응하는 MLIR 연산을 만든다.
예를 들어 a + b * c 같은 단순 산술 표현식을 변환한다면 파이프라인은 다음을 수행한다:
def convert_term_to_expr(tree: IRTerm) -> ir.Expr:
    """
    Convert a term to an expression.
    """

    # Parse the term into an AST
    astree = ast.parse(str(tree))

    # Mangle the assignment
    astree.body[-1] = ast.fix_missing_locations(mangle_assignment(astree.body[-1]))  # type: ignore

    # Execute the AST
    globals: dict[str, Any] = {}
    exec(compile(astree, "<string>", "exec"), function_map, globals)

    # Get the result
    result = globals["_out"]
    return result

def convert_term_to_mlir(tree: IRTerm, argspec: str) -> str:
    """
    Convert a term to MLIR.
    """

    expr = convert_term_to_expr(tree)
    argnames = map(lambda x: x.strip(), argspec.split(","))
    argmap = {k: f"%arg_{k}" for k in argnames}
    source = MLIRGen(expr, argmap).generate()
    return source
이제 표현식 트리에 적용할 재작성 규칙을 직접 작성할 수 있다.
birewrite_subsume 헬퍼 함수는 e-graph용 재작성 규칙을 산출(yield)하는 제너레이터다. 두 term을 받아 첫 번째 term을 두 번째 term으로 바꾸는 재작성 규칙을 산출하며, 이때 첫 번째 term이 더 이상 매칭되거나 추출되지 못하도록 만든다. 우리는 이를 사용해 일반 Term을 특수화된 이항/단항 연산으로 단방향 변환한다.
def birewrite_subsume(a: Term, b: Term) -> Generator[RewriteOrRule, None, None]:
    yield rewrite(a, subsume=True).to(b)
    yield rewrite(b).to(a)
기본 단순화 모듈은 항 재작성 시스템의 기반이 되는 기본 수학 재작성들을 구현한다. 이 규칙들은 basic_math ruleset에 조직되어 있으며, 여러 핵심 변환 범주를 포함한다:
각 규칙은 egglog의 재작성 시스템을 사용해 구현된다.
from mlir_egglog.term_ir import Term, Add, Mul, Div, Pow, PowConst, birewrite_subsume
from egglog import RewriteOrRule, ruleset, rewrite, i64, f64
from typing import Generator

@ruleset
def basic_math(
    x: Term, y: Term, z: Term, i: i64, f: f64
) -> Generator[RewriteOrRule, None, None]:
    # Allow us to translate Term into their specializations
    yield from birewrite_subsume(x + y, Add(x, y))
    yield from birewrite_subsume(x * y, Mul(x, y))
    yield from birewrite_subsume(x / y, Div(x, y))
    yield from birewrite_subsume(x**y, Pow(x, y))

    # x + 0 = x (integer case)
    yield rewrite(Add(x, Term.lit_i64(0))).to(x)
    # x + 0.0 = x (float case)
    yield rewrite(Add(x, Term.lit_f32(0.0))).to(x)
    # 0.0 + x = x (float case)
    yield rewrite(Add(Term.lit_f32(0.0), x)).to(x)

    # x * 1 = x
    yield rewrite(Mul(x, Term.lit_i64(1))).to(x)

    # x * 0 = 0
    yield rewrite(Mul(x, Term.lit_i64(0))).to(Term.lit_i64(0))

    # (x + y) + z = x + (y + z)
    yield rewrite(Add(x, Add(y, z))).to(Add(Add(x, y), z))

    # (x * y) * z = x * (y * z)
    yield rewrite(Mul(x, Mul(y, z))).to(Mul(Mul(x, y), z))

    # x + x = 2 * x
    yield rewrite(Add(x, x)).to(Mul(Term.lit_i64(2), x))

    # x * x = x^2
    yield rewrite(Mul(x, x)).to(Pow(x, Term.lit_i64(2)))

    # (x^y) * (x^z) = x^(y + z)
    yield rewrite(Pow(x, y) * Pow(x, z)).to(Pow(x, Add(y, z)))

    # x^i = x * x^(i - 1)
    yield rewrite(Pow(x, Term.lit_i64(i))).to(PowConst(x, i))

    # x^0 = 1
    yield rewrite(PowConst(x, 0)).to(Term.lit_f32(1.0))

    # x^1 = x
    yield rewrite(PowConst(x, 1)).to(x)

    # x^i = x * x^(i - 1)
    yield rewrite(PowConst(x, i)).to(Mul(x, PowConst(x, i - 1)), i > 1)
기본 단순화 모듈과 마찬가지로, 삼각함수 단순화 모듈은 삼각함수 및 쌍곡 함수가 포함된 표현식을 단순화하기 위한 포괄적인 규칙 집합을 제공한다. trig_simplify ruleset은 다음과 같은 중요한 변환 범주를 구현한다:
이 규칙들은 과학 계산과 머신러닝 응용에서 흔한 삼각함수 기반 수치 계산을 최적화하는 데 특히 중요하다. 이 모듈은 Term IR에서 정의한 비용 모델을 사용해, 표현식 단순화와 계산 효율 사이의 트레이드오프를 신중하게 균형 잡는다.
from mlir_egglog.term_ir import Sin, Cos, Sinh, Cosh, Tanh, Term, Pow, Add
from egglog import ruleset, i64, f64
from egglog import rewrite

@ruleset
def trig_simplify(x: Term, y: Term, z: Term, i: i64, fval: f64):
    # Fundamental trig identities
    # sin²(x) + cos²(x) = 1
    two = Term.lit_i64(2)
    yield rewrite(Add(Pow(Sin(x), two), Pow(Cos(x), two))).to(Term.lit_f32(1.0))

    # Double angle formulas
    yield rewrite(Sin(x + y)).to(Sin(x) * Cos(y) + Cos(x) * Sin(y))
    yield rewrite(Sin(x - y)).to(Sin(x) * Cos(y) - Cos(x) * Sin(y))
    yield rewrite(Cos(x + y)).to(Cos(x) * Cos(y) - Sin(x) * Sin(y))
    yield rewrite(Cos(x - y)).to(Cos(x) * Cos(y) + Sin(x) * Sin(y))

    # Hyperbolic identities
    yield rewrite(Sinh(x) * Cosh(y) + Cosh(y) * Sinh(x)).to(Sinh(x + y))
    yield rewrite(Cosh(x) * Cosh(y) + Sinh(x) * Sinh(y)).to(Cosh(x + y))
    yield rewrite((Tanh(x) + Tanh(y)) / (Term.lit_i64(1) + Tanh(x) * Tanh(y))).to(
        Tanh(x + y)
    )
egglog_optimizer.py)최적화 엔진은 모든 재작성 규칙을 결합하고, Python 함수에 최적화를 적용하기 위한 주요 인터페이스를 제공한다. 이는 몇 가지 핵심 구성 요소로 이루어진다:
최적화기는 e-graph 데이터 구조를 사용해 동치 표현식을 효율적으로 탐색하고, 비용 모델에 따라 가장 비용 효율적인 구현을 찾는다.
import inspect
from types import FunctionType

from egglog import EGraph, RewriteOrRule, Ruleset
from egglog.egraph import UnstableCombinedRuleset

from mlir_egglog.term_ir import Term, as_egraph
from mlir_egglog.python_to_ir import interpret
from mlir_egglog import builtin_functions as ns
from mlir_egglog.expr_model import Expr
from mlir_egglog.ir_to_mlir import convert_term_to_mlir

# Rewrite rules
from mlir_egglog.basic_simplify import basic_math
from mlir_egglog.trig_simplify import trig_simplify

OPTS: tuple[Ruleset | RewriteOrRule, ...] = (basic_math, trig_simplify)

def extract(ast: Expr, rules: tuple[RewriteOrRule | Ruleset, ...], debug=False) -> Term:
    root = as_egraph(ast)

    egraph = EGraph()
    egraph.let("root", root)

    # The user can compose rules as (rule1 | rule2) to apply them in parallel
    # or (rule1, rule2) to apply them sequentially
    for opt in rules:
        if isinstance(opt, Ruleset):
            egraph.run(opt.saturate())
        elif isinstance(opt, UnstableCombinedRuleset):
            egraph.run(opt.saturate())
        else:
            # For individual rules, create a temporary ruleset
            temp_ruleset = Ruleset("temp")
            temp_ruleset.append(opt)
            egraph.run(temp_ruleset.saturate())

    extracted = egraph.extract(root)

    # if debug:
    #     egraph.display()

    return extracted

def compile(
    fn: FunctionType, rewrites: tuple[RewriteOrRule | Ruleset, ...] = OPTS, debug=True
) -> str:
    # Convert np functions accordinging to the namespace map
    exprtree = interpret(fn, {"np": ns})
    extracted = extract(exprtree, rewrites, debug)

    # Get the argument spec
    argspec = inspect.signature(fn)
    params = ",".join(map(str, argspec.parameters))

    return convert_term_to_mlir(extracted, params)
이 모듈들은 함께 동작하여, 특히 삼각함수 및 초월 함수(transcendental functions)가 포함된 수학 표현식을 최적화하는 강력한 시스템을 제공한다. 이 시스템은 확장 가능하며 새 규칙을 쉽게 추가할 수 있고, 그 위에 더 특화된 최적화를 구축하기 위한 견고한 기반을 제공한다.
egglog 최적화기는 재작성 규칙을 합성하는 두 가지 방법을 지원한다: 병렬 합성과 순차 합성. 규칙을 | 연산자로 결합(병렬 합성)하면 e-graph 포화(saturation) 과정의 같은 반복(iteration)에서 동시에 적용된다. 이를 통해 여러 변환을 동시에 탐색할 수 있다. 반대로 튜플이나 시퀀스로 결합(순차 합성)하면 규칙 집합이 하나씩 적용되며, 다음으로 넘어가기 전에 각 ruleset이 포화될 때까지 실행된다. 이 순차 접근은 어떤 변환이 다른 변환 이후에만 시도되어야 할 때 유용하다.
# Example 1: Parallel Composition
# Both rulesets are applied simultaneously in each iteration
parallel_rules = simplify_adds | simplify_muls
egraph = EGraph()
egraph.run(parallel_rules.saturate())

# Example 2: Sequential Composition
# simplify_adds runs to completion before simplify_muls starts
sequential_rules = (simplify_adds, simplify_muls)
egraph = EGraph()
for ruleset in sequential_rules:
    egraph.run(ruleset.saturate())
mlir_gen.py)MLIR 코드 생성기는 최적화된 표현식 트리를 실행 가능한 MLIR 코드로 변환한다. 생성기는 N차원 배열을 효율적으로 처리할 수 있는 벡터화 커널을 생성하기 위해 체계적인 접근을 따른다. 핵심 구성 요소와 설계 원칙을 살펴보자.
생성기는 다음 템플릿을 따르는 함수를 만든다:
func.func @kernel_worker(
    %arg0: memref<?xf32>,
    %arg1: memref<?xf32>
) {
    // Kernel body
}
생성된 커널은 입력/출력 버퍼인 두 개의 memref 인자를 받아, affine 루프를 사용해 원소별(element-wise)로 처리한다. 이 설계는 어떤 차원의 배열에도 효율적인 벡터화 연산을 가능하게 한다.
func.func @kernel_worker(
    %arg0: memref<?xf32>,
    %arg1: memref<?xf32>
) attributes {llvm.emit_c_interface} {
    %c0 = arith.constant 0 : index

    // Get dimension of input array
    %dim = memref.dim %arg0, %c0 : memref<?xf32>

    // Process each element in a flattened manner
    affine.for %idx = %c0 to %dim {
        // Kernel body
    }
    return
}
MLIRGen 클래스는 다중 패스 번역 전략을 구현한다. 먼저 unfold 메서드를 통해 생성기가 표현식 트리를 완전한 부분표현식(subexpression) 집합으로 펼치는(subexpression expansion) 단계로 시작한다. 이 과정은 공통 부분표현식을 식별하고 재사용할 수 있도록 보장한다. 다음으로 위상 정렬(topological ordering)을 수행하여, 문자열 길이를 복잡도의 대리 지표로 사용해 간단한 표현식이 더 복잡한 표현식보다 먼저 평가되도록 부분표현식을 정렬한다. 마지막으로 코드 생성 파이프라인이 실행되며, 입력 변수들을 memref에서 로드하고, 부분표현식에 대한 중간 계산을 생성한 뒤, 최종 결과를 출력 memref에 저장한다.
생성기는 중복 계산을 피하기 위한 영리한 캐싱 메커니즘을 사용한다:
def walk(self, expr: ir.Expr):
    if expr in self.cache:
        return
    def lookup(e):
        return self.cache.get(e) or as_source(e, self.vars, lookup)
    self.cache[expr] = as_source(expr, self.vars, lookup)
이 캐싱 전략은 각 부분표현식이 정확히 한 번만 계산되도록 하고, 공통 부분표현식은 MLIR의 SSA(Static Single Assignment) 형태를 통해 재사용되며, 생성된 코드가 최적의 효율을 유지하도록 한다.
그 다음 생성기는 표현식 트리를 순회하며 고수준 표현식을 적절한 MLIR 방언으로 매핑한다:
arith 방언을 사용(예: arith.addf, arith.mulf)math 방언을 사용(예: math.sin, math.exp)memref 방언을 사용affine 방언을 사용예를 들어 sin(x) + cos(y) 같은 Python 표현식은 다음으로 번역된다:
%sin = math.sin %arg_x : f32
%cos = math.cos %arg_y : f32
%result = arith.addf %sin, %cos : f32
생성기는 타입 변환을 자동으로 처리하여 부동소수점 연산을 f32로 표준화하고, 정수 연산에는 적절히 i32 또는 i64를 사용한다. 필요할 때는 정수를 부동소수점으로 바꾸는 arith.sitofp 같은 명시적 캐스트도 생성한다. 이 타입 시스템은 MLIR의 강한 타입 요구사항과의 호환성을 유지하면서 타입 안전성을 보장한다.
from textwrap import indent
from typing import Callable
from mlir_egglog import expr_model as ir

KERNEL_NAME = "kernel_worker"

# Numpy vectorized kernel that supports N-dimensional arrays
kernel_prologue = f"""
func.func @{KERNEL_NAME}(
    %arg0: memref<?xf32>,
    %arg1: memref<?xf32>
) attributes  \{\{
    %c0 = arith.constant 0 : index

    // Get dimension of input array
    %dim = memref.dim %arg0, %c0 : memref<?xf32>

    // Process each element in a flattened manner
    affine.for %idx = %c0 to %dim \{\{
"""

kernel_epilogue = """
    }
    return
}
"""

class MLIRGen:
    """
    Generate textual MLIR from a symbolic expression.
    """

    root: ir.Expr
    cache: dict[ir.Expr, str]
    subexprs: dict[str, str]
    vars: list[str]  # local variables

    def __init__(self, root: ir.Expr, argmap: dict[str, str]):
        # Use the keys from argmap as the variable names
        self.root = root
        self.cache = {}
        self.vars = list(argmap.keys())
        self.subexprs = {}

    def generate(self):
        """
        Generate MLIR code for the root expression.
        """
        subexprs = list(self.unfold(self.root))
        subexprs.sort(key=lambda x: len(str(x)))

        buf = []
        # First load input arguments from memref
        for var in self.vars:
            buf.append(f"%arg_{var} = affine.load %arg0[%idx] : memref<?xf32>")

        for i, subex in enumerate(subexprs):
            # Skip if this is just a variable reference
            if isinstance(subex, ir.Symbol) and subex.name in self.vars:
                continue

            # Recurse and cache the subexpression
            self.walk(subex)
            orig = self.cache[subex]

            # Generate a unique name for the subexpression
            k = f"%v{i}"
            self.cache[subex] = k
            self.subexprs[k] = orig

            # Append the subexpression to the buffer
            buf.append(f"{k} = {orig}")

        self.walk(self.root)
        res = self.cache[self.root]

        # Handle the output
        buf.append(f"affine.store {res}, %arg1[%idx] : memref<?xf32>")

        # Format the kernel body
        kernel_body = indent("\n".join(buf), "    " * 2)
        return kernel_prologue + kernel_body + kernel_epilogue

    def unfold(self, expr: ir.Expr):
        """
        Unfold an expression into a set of subexpressions.
        """
        visited = set()
        all_subexprs = set()
        to_visit = [expr]
        while to_visit:
            current = to_visit.pop()
            all_subexprs.add(current)
            if current in visited:
                continue
            visited.add(current)
            to_visit.extend(get_children(current))

        return all_subexprs

    def walk(self, expr: ir.Expr):
        """
        Walk an expression recursively and generate MLIR code for subexpressions,
        caching the intermediate expressions in a lookup table.
        """
        if expr in self.cache:
            return

        def lookup(e):
            return self.cache.get(e) or as_source(e, self.vars, lookup)

        self.cache[expr] = as_source(expr, self.vars, lookup)

def get_children(expr: ir.Expr):
    """Get child expressions for an AST node."""
    match expr:
        case ir.BinaryOp():
            return {expr.lhs, expr.rhs}
        case ir.UnaryOp():
            return {expr.operand}
        case ir.FloatLiteral() | ir.IntLiteral() | ir.Symbol():
            return set()
        case _:
            raise NotImplementedError(f"Unsupported expression type: {type(expr)}")

def as_source(
    expr: ir.Expr, vars: list[str], lookup_fn: Callable[[ir.Expr], str]
) -> str:
    """
    Convert expressions to MLIR source code using arith and math dialects.
    """
    match expr:
        # Literals and Symbols
        case ir.FloatLiteral(fval=val):
            return f"arith.constant {val:e} : f32"
        case ir.IntLiteral(ival=val):
            return f"arith.constant {val} : i32"
        case ir.Symbol(name=name) if name in vars:
            return f"%arg_{name}"
        case ir.Symbol(name=name):
            return f"%{name}"

        # Binary Operations
        case ir.Add(lhs=lhs, rhs=rhs):
            return f"arith.addf {lookup_fn(lhs)}, {lookup_fn(rhs)} : f32"
        case ir.Mul(lhs=lhs, rhs=rhs):
            return f"arith.mulf {lookup_fn(lhs)}, {lookup_fn(rhs)} : f32"
        case ir.Div(lhs=lhs, rhs=rhs):
            return f"arith.divf {lookup_fn(lhs)}, {lookup_fn(rhs)} : f32"
        case ir.Maximum(lhs=lhs, rhs=rhs):
            return f"arith.maximumf {lookup_fn(lhs)}, {lookup_fn(rhs)} : f32"

        # Unary Math Operations
        case (
            ir.Sin()
            | ir.Cos()
            | ir.Log()
            | ir.Sqrt()
            | ir.Exp()
            | ir.Sinh()
            | ir.Cosh()
            | ir.Tanh()
        ) as op:
            op_name = type(op).__name__.lower()
            return f"math.{op_name} {lookup_fn(op.operand)} : f32"
        case ir.Neg(operand=op):
            return f"arith.negf {lookup_fn(op)} : f32"

        # Type Casting
        case ir.CastF32(operand=op):
            return f"arith.sitofp {lookup_fn(op)} : i64 to f32"
        case ir.CastI64(operand=op):
            return f"arith.fptosi {lookup_fn(op)} : f32 to i64"

        case _:
            raise NotImplementedError(f"Unsupported expression type: {type(expr)}")
mlir_backend.py)컴파일러의 MLIR 백엔드는 고수준 MLIR 코드를 여러 내리기(lowering) 단계를 거쳐 LLVM IR로, 그리고 최종적으로 실행 코드로 변환하는 역할을 한다. 핵심 구성 요소와 설계 원칙을 살펴보자.
백엔드는 두 가지 주요 컴파일 타깃을 지원한다:
class Target(enum.Enum):
    OPENMP = "openmp"      # Parallel execution using OpenMP
    BASIC_LOOPS = "loops"  # Sequential execution with basic loops
즉, OpenMP를 사용한 멀티스레드 병렬 코드 또는 더 단순한 순차 루프 코드를 애플리케이션 요구에 따라 생성할 수 있다.
컴파일 과정은 몇 가지 명확한 단계로 구성되며, 각 단계는 특정 MLIR 최적화 패스를 적용한다:
COMMON_INITIAL_OPTIONS = (
    "--debugify-level=locations",
    "--inline",
    "-affine-loop-normalize",
    "-affine-parallelize",
    "-affine-super-vectorize",
    "--affine-scalrep",
    "-lower-affine",
    "-convert-vector-to-scf",
    "-convert-linalg-to-loops",
)
이 패스들은 함수 인라이닝, 루프 정규화, 벡터화, 그리고 초기 방언 변환을 처리한다.
* **OpenMP 경로**: 구조적 제어 흐름을 OpenMP 연산으로 변환한 뒤 LLVM으로 변환
OPENMP_OPTIONS = (
    "-convert-scf-to-openmp",
    "-convert-openmp-to-llvm",
    "-convert-vector-to-llvm",
    "-convert-math-to-llvm",
    # ... additional lowering passes
)
* **기본 루프 경로**: 순차 LLVM IR로 직접 변환
BASIC_LOOPS_OPTIONS = (
    "-convert-scf-to-cf",
    "-convert-vector-to-llvm",
    "-convert-math-to-llvm",
    # ... additional lowering passes
)
MLIR_TRANSLATE_OPTIONS = (
    "--mlir-print-local-scope",
    "--mlir-to-llvmir",
    "--verify-diagnostics",
)
MLIRCompiler 클래스는 전체 컴파일 과정을 세 가지 주요 단계로 조정(orchestrate)한다:
to_llvm_dialect):* 고수준 MLIR 연산을 LLVM 방언으로 변환
*   타깃별 최적화(OpenMP 또는 기본 루프) 적용
*   메모리 레이아웃 및 타입 변환 처리
2. LLVM 방언 → LLVM IR (mlir_translate_to_llvm_ir):
*   LLVM 방언 표현을 텍스트 LLVM IR로 번역
*   디버그 정보를 보존하고 생성된 코드 검증
3. LLVM IR → 비트코드 (llvm_ir_to_bitcode):
*   텍스트 LLVM IR을 바이너리 LLVM 비트코드로 변환
*   최종 실행을 위해 코드 준비
백엔드는 중간 표현을 위해 임시 파일을 사용하고, debug 플래그를 통해 디버깅 기능을 제공한다:
def _run_shell(self, cmd, in_mode, out_mode, src):
    with (
        NamedTemporaryFile(mode=f"w{in_mode}") as src_file,
        NamedTemporaryFile(mode=f"r{out_mode}") as out_file,
    ):
        # Execute compilation command and handle I/O
그 다음 컴파일러는 LLVM IR을 내보내며, llvmlite 라이브러리를 사용해 이를 로드하고 Python 프로세스 안에서 실행할 수 있다. 이를 통해 컴파일된 머신 코드를 동적으로 로드할 수 있다.
llvm_runtime.py)LLVM 런타임은 컴파일 파이프라인의 최종 레이어로, Python 안에서 컴파일된 LLVM 코드를 동적으로 로드하고 실행하는 일을 처리한다. 이 구성 요소는 llvmlite를 사용해 LLVM과 인터페이스하고, JIT(Just-In-Time) 컴파일 과정을 관리한다.
런타임은 LLVM 구성 요소를 캐시된 초기화로 시작한다:
@cache
def init_llvm():
    llvm.initialize()
    llvm.initialize_all_targets()
    llvm.initialize_all_asmprinters()
이 초기화는 Python 세션당 한 번만 발생하도록 캐시되어, 핵심 LLVM 기능, 사용 가능한 모든 타깃 아키텍처, 코드 생성을 위한 어셈블리 프린터를 설정한다.
런타임은 JIT 컴파일을 관리하는 LLVM 실행 엔진을 만든다:
def create_execution_engine():
    target = llvm.Target.from_default_triple()
    target_machine = target.create_target_machine()
    backing_mod = llvm.parse_assembly("")
    engine = llvm.create_mcjit_compiler(backing_mod, target_machine)
    return engine
이 설정은 호스트 머신의 타깃 아키텍처를 결정하고, 코드 생성을 위한 target machine 인스턴스를 만들며, 백킹 저장소로 빈 LLVM 모듈을 초기화하고, 최적화된 코드 실행을 위한 MCJIT 컴파일러 인스턴스를 생성한다.
런타임은 두 수준의 모듈 컴파일을 제공한다:
def compile_mod(engine, mod):
    mod.verify()                     # Verify module correctness
    engine.add_module(mod)           # Add to execution engine
    engine.finalize_object()         # Finalize compilation
    engine.run_static_constructors() # Initialize static data
    return mod
def compile_ir(engine, llvm_ir):
    mod = llvm.parse_assembly(llvm_ir)  # Parse IR text
    return compile_mod(engine, mod)      # Compile module
이 런타임 레이어는 LLVM의 저수준 컴파일 인프라와 Python의 고수준 실행 환경 사이의 간극을 메우며, 컴파일된 커널이 Python 프로세스 안에서 효율적으로 실행되도록 해준다.
import llvmlite.binding as llvm
import llvmlite
from functools import cache

@cache
def init_llvm():
    print(llvmlite.__version__)
    llvm.initialize()
    llvm.initialize_all_targets()
    llvm.initialize_all_asmprinters()

def compile_mod(engine, mod):
    mod.verify()
    engine.add_module(mod)
    engine.finalize_object()
    engine.run_static_constructors()
    return mod

def create_execution_engine():
    target = llvm.Target.from_default_triple()
    target_machine = target.create_target_machine()
    backing_mod = llvm.parse_assembly("")
    engine = llvm.create_mcjit_compiler(backing_mod, target_machine)
    return engine

def compile_ir(engine, llvm_ir):
    mod = llvm.parse_assembly(llvm_ir)
    return compile_mod(engine, mod)
jit_engine.py)jit_engine.py 모듈은 컴파일러 파이프라인의 조정자(orchestrator)로, 모든 구성 요소를 매끄러운 컴파일 과정으로 묶는다. Python 함수에서 실행 가능한 머신 코드에 이르기까지의 전체 생명주기를 관리하며, 최적화, 코드 생성, 런타임 실행을 처리한다.
JITEngine 클래스는 세 가지 주요 컴파일 수준을 제공한다:
run_frontend):def run_frontend(
self,
fn: FunctionType,
rewrites: tuple[RewriteOrRule | Ruleset, ...] | None = None,
) -> str:
run_frontend는 Python 함수와 선택적 재작성 규칙을 받아, egglog 최적화기로 항 재작성을 수행하고 최적화된 MLIR 코드를 생성한다.
run_backend):def run_backend(self, mlir_src: str) -> bytes:
mlir_compiler = MLIRCompiler(debug=False)
mlir_omp = mlir_compiler.to_llvm_dialect(mlir_src)
llvm_ir = mlir_compiler.mlir_translate_to_llvm_ir(mlir_omp)
run_backend는 MLIR을 LLVM 방언으로 변환하고, 이를 LLVM IR로 번역하며, 플랫폼별 최적화를 처리한 뒤 최종적으로 컴파일된 함수의 주소를 반환한다.
jit_compile):def jit_compile(
self,
fn: FunctionType,
rewrites: tuple[RewriteOrRule | Ruleset, ...] | None = None,
) -> bytes:
mlir = self.run_frontend(fn, rewrites)
address = self.run_backend(mlir)
return address
jit_compile는 프론트엔드와 백엔드 컴파일을 결합하여 전체 컴파일 과정의 단일 진입점을 제공한다.
OpenMP runtime을 사용하려면, 시스템별 OpenMP 라이브러리를 Python 프로세스에 로드해야 한다. 이를 위해 공유 라이브러리의 올바른 경로를 알고 있다면 ctypes 라이브러리를 통해 로드할 수 있다.
def find_omp_path():
if sys.platform.startswith("linux"):
omppath = ctypes.util.find_library("libgomp.so")
elif sys.platform.startswith("darwin"):
omppath = ctypes.util.find_library("iomp5")
else:
raise RuntimeError(f"Unsupported platform: {sys.platform}")
return omppath
엔진은 몇 가지 중요한 LLVM 관련 작업을 처리한다:
def __init__(self):
init_llvm()
omppath = find_omp_path()
ctypes.CDLL(omppath, mode=os.RTLD_NOW)
self.ee = create_execution_engine()
* LLVM 인프라 초기화
* OpenMP runtime 로드
* 실행 엔진 생성
이 클래스는 컴파일러 구성 요소들을 결합하는 접착제(glue) 역할을 하며, Python 코드와 최적화된 머신 코드 실행 사이의 인터페이스를 제공한다. 다단계 컴파일의 복잡성, 플랫폼별 요구사항, 런타임 최적화를 처리한다.
from __future__ import annotations
import ctypes
import ctypes.util
import os
import sys
from types import FunctionType
from egglog import RewriteOrRule, Ruleset
import llvmlite.binding as llvm
from mlir_egglog.llvm_runtime import (
create_execution_engine,
init_llvm,
compile_mod,
)
from mlir_egglog.mlir_gen import KERNEL_NAME
from mlir_egglog.mlir_backend import MLIRCompiler, Target
from mlir_egglog.egglog_optimizer import compile, OPTS
def find_omp_path():
if sys.platform.startswith("linux"):
omppath = ctypes.util.find_library("libgomp.so")
elif sys.platform.startswith("darwin"):
omppath = ctypes.util.find_library("iomp5")
else:
raise RuntimeError(f"Unsupported platform: {sys.platform}")
return omppath
class JITEngine:
def __init__(self):
init_llvm()
omppath = find_omp_path()
ctypes.CDLL(omppath, mode=os.RTLD_NOW)
self.ee = create_execution_engine()
def run_frontend(
    self,
    fn: FunctionType,
    rewrites: tuple[RewriteOrRule | Ruleset, ...] | None = None,
) -> str:
actual_rewrites = rewrites if rewrites is not None else OPTS
return compile(fn, rewrites=actual_rewrites, debug=False)
def run_backend(self, mlir_src: str) -> bytes:
mlir_compiler = MLIRCompiler(debug=False)
mlir_omp = mlir_compiler.to_llvm_dialect(mlir_src, target=Target.BASIC_LOOPS)
llvm_ir = mlir_compiler.mlir_translate_to_llvm_ir(mlir_omp)
print(llvm_ir)
print("Parsing LLVM assembly.")
try:
# Clean up the LLVM IR by ensuring proper line endings and formatting
llvm_ir = llvm_ir.strip()
# Clean up problematic attribute strings (hack for divergence in modern LLVM IR syntax with old llvmlite)
llvm_ir = llvm_ir.replace("captures(none)", " ")
llvm_ir = llvm_ir.replace("memory(argmem: readwrite)", "")
llvm_ir = llvm_ir.replace("memory(none)", "")
llvm_ir += "\n"
mod = llvm.parse_assembly(llvm_ir)
mod = compile_mod(self.ee, mod)
# Resolve the function address
func_name = f"_mlir_ciface_{KERNEL_NAME}"
address = self.ee.get_function_address(func_name)
assert address, "Function must be compiled successfully."
return address
except Exception as e:
print(f"Error during LLVM IR parsing/compilation: {str(e)}")
print("LLVM IR that failed to parse:")
print(llvm_ir)
raise
def jit_compile(
    self,
    fn: FunctionType,
    rewrites: tuple[RewriteOrRule | Ruleset, ...] | None = None,
) -> bytes:
    mlir = self.run_frontend(fn, rewrites)
    address = self.run_backend(mlir)
    return address
dispatcher.py)Dispatcher는 사용자 관점의 인터페이스로, 일반 Python 함수를 최적화된 벡터화 커널로 변환하는 데코레이터를 제공한다. 컴파일 과정을 처리하고 컴파일된 함수의 실행을 관리한다.
Dispatcher 클래스는 컴파일된 함수의 생명주기를 관리한다:
class Dispatcher:
    _compiled_func: bytes | None      # Compiled function address
    _compiler: JITEngine | None       # JIT compilation engine
    py_func: types.FunctionType       # Original Python function
    rewrites: tuple[RewriteOrRule, ...] | None  # Optimization rules
컴파일 과정은 컴파일러의 jit_compile 메서드를 호출하는 간단한 인터페이스로 처리된다.
def compile(self):
    self._compiler = JITEngine()
    binary = self._compiler.jit_compile(self.py_func, self.rewrites)
    self._compiled_func = binary
    return binary
이 메서드는 새 JIT 엔진 인스턴스를 만들고, 지정된 재작성 규칙으로 Python 함수를 컴파일한 뒤, 이후 실행을 위해 컴파일된 바이너리를 저장한다. 디스패처는 이후 호출에서 재컴파일을 피하기 위한 캐시된 호출 메커니즘을 구현한다. 컴파일된 함수를 numpy 배열로 호출하면 디스패처는 입력 배열의 버퍼를 가져오고 동일한 형태의 빈 출력 배열을 할당한다. 그 다음 numpy 배열을 memref 디스크립터로 변환하여 컴파일된 함수에 전달한다.
def __call__(self, *args, **kwargs):
    # Get the input array and its shape
    input_array = args[0]
    original_shape = input_array.shape

    # Flatten the input array
    flattened_input = input_array.flatten()
    flattened_output = np.empty_like(flattened_input)

    # Convert to memrefs
    memrefs = [
        as_memref_descriptor(flattened_input, ctypes.c_float),
        as_memref_descriptor(flattened_output, ctypes.c_float)
    ]
그 다음 디스패처는 MCJIT 컴파일된 메모리에서 함수 포인터를 조회하고, memref 디스크립터를 인자로 전달하여 호출한다.
# Create function prototype for ctypes
prototype = ctypes.CFUNCTYPE(None, *[ctypes.POINTER(type(x)) for x in memrefs])

# Execute compiled function
cfunc = prototype(self._compiled_func)
cfunc(*[ctypes.byref(x) for x in memrefs])
이제 컴파일러를 사용해 함수를 컴파일하려면, 사용자 함수에 @kernel 데코레이터를 붙이면 된다.
import llvmlite
import numpy as np
llvmlite.opaque_pointers_enabled = True

from mlir_egglog import kernel

@kernel("float32(float32)")
def fn(a):
    return np.sin(a) * np.cos(a) + np.cos(a) * np.sin(a)

out = fn(np.array([1.0], dtype=np.float32))
print(out)
이것은 매우 단순한 예시 컴파일러다. 기호적 해석 접근은 근본적으로 제한이 있는데, 제어 흐름이 없는 평평한 함수만 처리할 수 있고, 인자 타입을 수동으로 지정해야 하며, 지원하는 연산의 집합도 제한적이다. 하지만 MLIR과 e-graph를 사용해 최적화를 수행하고 처음부터 끝까지 동작하는 무언가를 보는 출발점으로는 충분히 좋다.