무겁고 비효율적인 MCP 서버 대신 Bash와 간단한 Node.js 스크립트로 브라우저 개발 도구 워크플로를 구성하는 방법을 소개한다. Start·Navigate·Evaluate·Screenshot 같은 최소 도구로 협업/스크래핑을 수행하고, Pick·Cookies 도구를 더해 확장하는 과정, MCP 대비 장점, 실제 예시, 에이전트 간 재사용 전략을 다룬다.
MCP가 전혀 필요 없다면?
2025-11-02
덩치 큰 MCP 서버 하나
몇 달 간의 에이전트 중심 코딩 광풍이 이어진 뒤에도, 트위터는 여전히 MCP 서버 이야기로 뜨겁다. 예전에 아주 가벼운 벤치마킹을 해서 Bash 도구와 MCP 서버 중 무엇이 특정 작업에 더 적합한지 살펴본 적이 있다. TL;DR: 신경 써서 쓰면 둘 다 효율적일 수 있다.
안타깝게도 가장 인기 있는 MCP 서버 상당수는 특정 작업에 비효율적이다. 모든 경우를 커버해야 하기에, 아주 많은 도구와 장황한 설명을 담고 있어 문맥을 심하게 잡아먹는다.
기존 MCP 서버를 확장하기도 어렵다. 소스를 받아 고치면 되지만, 그러려면 코드베이스를 이해해야 하고, 그것을 에이전트에게도 이해시키어야 한다.
MCP 서버는 합성 가능성도 떨어진다. MCP 서버가 반환한 결과를 디스크에 저장하거나 다른 결과와 결합하려면, 반드시 에이전트의 컨텍스트를 거쳐야 한다.
나는 단순한 걸 좋아하는 단순한 사람이다. 에이전트는 Bash를 실행하고 코드를 잘 쓴다. Bash와 코드는 합성이 쉽다. 그렇다면 에이전트가 그냥 CLI 도구를 호출하고 코드를 쓰게 하는 것보다 더 단순한 게 있을까? 이건 새로울 게 없다. 우리 모두 처음부터 이렇게 해 왔다. 다만 많은 상황에서 MCP 서버가 필요하지도, 원하지도 않을 수 있다는 점을 설득하고 싶다.
이를 일반적인 MCP 서버 사용 사례로 설명해 보자: 브라우저 개발 도구.
내 사용 사례는 에이전트와 함께 웹 프론트엔드를 작업하거나, 에이전트를 혹사해 세상의 모든 데이터를 긁어모으는 스크래핑 해커로 만드는 것이다. 이 두 가지를 위해 필요한 도구는 최소한이면 된다:
그리고 사용 사례에 특수한 도구가 더 필요하면, 에이전트가 금방 만들어서 다른 도구들과 함께 끼워 넣을 수 있기를 바란다.
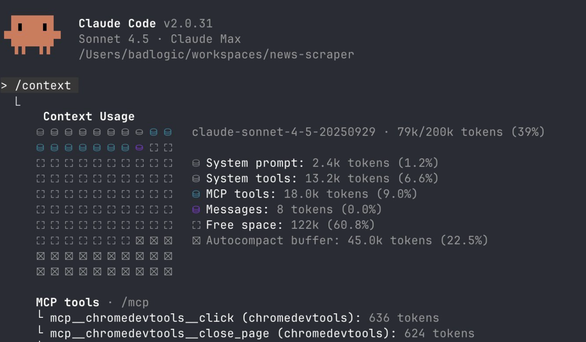
위 사례에 대해 사람들은 Playwright MCP나 Chrome DevTools MCP를 추천할 것이다. 둘 다 괜찮지만, 모든 경우를 커버해야 한다. Playwright MCP는 21개의 도구에 13.7k 토큰(Claude 컨텍스트의 6.8%)을, Chrome DevTools MCP는 26개의 도구에 18.0k 토큰(9.0%)을 사용한다. 도구가 이렇게 많으면, 특히 다른 MCP 서버나 내장 도구와 함께 쓰일 때 에이전트가 혼란스러워진다.
이 도구들을 사용하면 합성 문제도 겪는다. 모든 출력이 에이전트의 컨텍스트를 거쳐야 한다. 서브 에이전트를 쓰면 어느 정도 완화할 수 있지만, 그러면 서브 에이전트가 가진 모든 문제를 같이 끌어안게 된다.
다음은 README.md로 보여 주는 나의 최소 도구 세트다:
# Browser Tools

Minimal CDP tools for collaborative site exploration.

## Start Chrome

\`\`\`bash
./start.js              # Fresh profile
./start.js --profile    # Copy your profile (cookies, logins)
\`\`\`

Start Chrome on `:9222` with remote debugging.

## Navigate

\`\`\`bash
./nav.js https://example.com
./nav.js https://example.com --new
\`\`\`

Navigate current tab or open new tab.

## Evaluate JavaScript

\`\`\`bash
./eval.js 'document.title'
./eval.js 'document.querySelectorAll("a").length'
\`\`\`

Execute JavaScript in active tab (async context).

## Screenshot

\`\`\`bash
./screenshot.js
\`\`\`

Screenshot current viewport, returns temp file path.
이게 전부다. 내 에이전트에 주는 내용은 이것뿐. 이 몇 가지 도구면 내 사용 사례의 기본을 모두 커버한다. 각 도구는 Puppeteer Core를 사용하는 간단한 Node.js 스크립트다. 에이전트는 저 README만 읽으면, 어떤 도구가 있고 언제 어떻게 Bash로 쓰는지 안다.
브라우저와 상호작용해야 하는 세션을 시작할 때, 그 파일을 통째로 읽으라고만 하면 된다. 그러면 충분히 효과적이다. 실제 구현을 훑어보며 코드가 얼마나 적은지 보자.
에이전트는 새 브라우저 세션을 시작할 수 있어야 한다. 스크래핑 작업에선 내 실제 Chrome 프로필을 써서 어디든 로그인된 상태로 하고 싶을 때가 많다. 이 스크립트는 Chrome 프로필을 임시 폴더로 rsync(Chrome은 기본 프로필에서 디버깅을 허용하지 않는다)하거나, 새로 시작한다:
#!/usr/bin/env node

import { spawn, execSync } from "node:child_process";
import puppeteer from "puppeteer-core";

const useProfile = process.argv[2] === "--profile";

if (process.argv[2] && process.argv[2] !== "--profile") {
    console.log("Usage: start.ts [--profile]");
    console.log("\nOptions:");
    console.log("  --profile  Copy your default Chrome profile (cookies, logins)");
    console.log("\nExamples:");
    console.log("  start.ts            # Start with fresh profile");
    console.log("  start.ts --profile  # Start with your Chrome profile");
    process.exit(1);
}

// Kill existing Chrome
try {
    execSync("killall 'Google Chrome'", { stdio: "ignore" });
} catch {}

// Wait a bit for processes to fully die
await new Promise((r) => setTimeout(r, 1000));

// Setup profile directory
execSync("mkdir -p ~/.cache/scraping", { stdio: "ignore" });

if (useProfile) {
    // Sync profile with rsync (much faster on subsequent runs)
    execSync(
        'rsync -a --delete "/Users/badlogic/Library/Application Support/Google/Chrome/" ~/.cache/scraping/',
        { stdio: "pipe" },
    );
}

// Start Chrome in background (detached so Node can exit)
spawn(
    "/Applications/Google Chrome.app/Contents/MacOS/Google Chrome",
    ["--remote-debugging-port=9222", `--user-data-dir=${process.env["HOME"]}/.cache/scraping`],
    { detached: true, stdio: "ignore" },
).unref();

// Wait for Chrome to be ready by attempting to connect
let connected = false;
for (let i = 0; i < 30; i++) {
    try {
        const browser = await puppeteer.connect({
            browserURL: "http://localhost:9222",
            defaultViewport: null,
        });
        await browser.disconnect();
        connected = true;
        break;
    } catch {
        await new Promise((r) => setTimeout(r, 500));
    }
}

if (!connected) {
    console.error("✗ Failed to connect to Chrome");
    process.exit(1);
}

console.log(`✓ Chrome started on :9222${useProfile ? " with your profile" : ""}`);
에이전트가 알아야 할 것은 Bash로 start.js 스크립트를 --profile 유무에 따라 실행하면 된다는 것뿐이다.
브라우저가 실행되면, 에이전트는 새 탭 또는 활성 탭에서 URL로 이동해야 한다. 그걸 정확히 제공하는 게 navigate 도구다:
#!/usr/bin/env node

import puppeteer from "puppeteer-core";

const url = process.argv[2];
const newTab = process.argv[3] === "--new";

if (!url) {
    console.log("Usage: nav.js <url> [--new]");
    console.log("\nExamples:");
    console.log("  nav.js https://example.com       # Navigate current tab");
    console.log("  nav.js https://example.com --new # Open in new tab");
    process.exit(1);
}

const b = await puppeteer.connect({
    browserURL: "http://localhost:9222",
    defaultViewport: null,
});

if (newTab) {
    const p = await b.newPage();
    await p.goto(url, { waitUntil: "domcontentloaded" });
    console.log("✓ Opened:", url);
} else {
    const p = (await b.pages()).at(-1);
    await p.goto(url, { waitUntil: "domcontentloaded" });
    console.log("✓ Navigated to:", url);
}

await b.disconnect();
에이전트는 활성 탭의 DOM을 읽고 수정할 수 있도록 JavaScript를 실행해야 한다. 에이전트가 작성하는 JavaScript는 페이지 컨텍스트에서 실행되므로, Puppeteer 자체와 씨름할 필요가 없다. DOM API로 코드를 쓰는 방법만 알면 되는데, 그건 에이전트가 아주 잘 안다:
#!/usr/bin/env node

import puppeteer from "puppeteer-core";

const code = process.argv.slice(2).join(" ");
if (!code) {
    console.log("Usage: eval.js 'code'");
    console.log("\nExamples:");
    console.log('  eval.js "document.title"');
    console.log('  eval.js "document.querySelectorAll(\'a\').length"');
    process.exit(1);
}

const b = await puppeteer.connect({
    browserURL: "http://localhost:9222",
    defaultViewport: null,
});

const p = (await b.pages()).at(-1);

if (!p) {
    console.error("✗ No active tab found");
    process.exit(1);
}

const result = await p.evaluate((c) => {
    const AsyncFunction = (async () => {}).constructor;
    return new AsyncFunction(`return (${c})`)();
}, code);

if (Array.isArray(result)) {
    for (let i = 0; i < result.length; i++) {
        if (i > 0) console.log("");
        for (const [key, value] of Object.entries(result[i])) {
            console.log(`${key}: ${value}`);
        }
    }
} else if (typeof result === "object" && result !== null) {
    for (const [key, value] of Object.entries(result)) {
        console.log(`${key}: ${value}`);
    }
} else {
    console.log(result);
}

await b.disconnect();
가끔은 에이전트가 페이지의 시각적 인상을 파악해야 한다. 당연히 스크린샷 도구가 필요하다:
#!/usr/bin/env node

import { tmpdir } from "node:os";
import { join } from "node:path";
import puppeteer from "puppeteer-core";

const b = await puppeteer.connect({
    browserURL: "http://localhost:9222",
    defaultViewport: null,
});

const p = (await b.pages()).at(-1);

if (!p) {
    console.error("✗ No active tab found");
    process.exit(1);
}

const timestamp = new Date().toISOString().replace(/[:.]/g, "-");
const filename = `screenshot-${timestamp}.png`;
const filepath = join(tmpdir(), filename);

await p.screenshot({ path: filepath });

console.log(filepath);

await b.disconnect();
이 도구는 활성 탭의 현재 뷰포트를 스크린샷으로 찍어 임시 디렉터리의 .png 파일로 저장하고, 파일 경로를 에이전트에게 출력한다. 에이전트는 그 경로를 읽어 비전 능력으로 이미지를 “볼” 수 있다.
위에서 언급한 MCP 서버와 비교하면 어떨까? 우선, 필요할 때만 README를 끌어다 쓰면 되고 매 세션마다 비용을 내지 않는다. 이는 Anthropic이 최근 도입한 skills 기능과 매우 비슷하다. 다만 더 즉흥적이고 어떤 코딩 에이전트에서도 작동한다. 내가 할 일은 에이전트에게 README 파일을 읽으라고 지시하는 것뿐이다.
사족: 나를 포함해 많은 사람이 Anthropic의 skills가 나오기 전부터 이런 셋업을 써 왔다. 내 "Prompts are Code" 블로그 글이나 작은 sitegeist.ai에서도 비슷한 걸 볼 수 있다. Armin도 예전에 MCP보다 Bash와 코드의 힘을 언급했다. Anthropic의 skills는 점진적 공개(아주 좋다)를 제공하고, 거의 모든 제품에서 비기술 사용자에게까지 이를 제공한다(이것도 좋다).
README 얘기를 계속하자. 위 MCP 서버들은 13,000~18,000 토큰을 끌어오지만, 이 README는 고작 225 토큰이다. 모델이 코드를 쓰고 Bash를 쓸 줄 안다는 사실 덕분에 가능한 효율이다. 나는 그들의 기존 지식을 적극 활용해 컨텍스트 공간을 아낀다.
이 간단한 도구들은 합성도 쉽다. 호출 결과를 컨텍스트로 바로 읽어들이는 대신, 에이전트가 파일로 저장해 나중에 스스로 또는 코드로 처리할 수 있다. 또한 한 번의 Bash 명령으로 호출을 쉽게 체인으로 엮을 수 있다.
도구의 출력이 토큰 효율적이지 않다고 느끼면, 그냥 출력 포맷을 바꾸면 된다. 어떤 MCP 서버를 쓰느냐에 따라 어렵거나 불가능한 일이다.
그리고 내 필요에 맞게 새 도구를 추가하거나 기존 도구를 수정하는 일은 말도 안 되게 쉽다. 예시로 보여주겠다.
에이전트와 특정 사이트의 스크래핑 방법을 함께 고민할 때, 내가 그냥 DOM 요소를 클릭해서 직접 가리켜 주는 편이 더 효율적일 때가 많다. 이를 아주 쉽게 만들기 위해, 피커를 직접 만들면 된다. README에 이렇게 추가한다:
## Pick Elements

\`\`\`bash
./pick.js "Click the submit button"
\`\`\`

Interactive element picker. Click to select, Cmd/Ctrl+Click for multi-select, Enter to finish.
그리고 코드는 다음과 같다:
#!/usr/bin/env node

import puppeteer from "puppeteer-core";

const message = process.argv.slice(2).join(" ");
if (!message) {
    console.log("Usage: pick.js 'message'");
    console.log("\nExample:");
    console.log('  pick.js "Click the submit button"');
    process.exit(1);
}

const b = await puppeteer.connect({
    browserURL: "http://localhost:9222",
    defaultViewport: null,
});

const p = (await b.pages()).at(-1);

if (!p) {
    console.error("✗ No active tab found");
    process.exit(1);
}

// Inject pick() helper into current page
await p.evaluate(() => {
    if (!window.pick) {
        window.pick = async (message) => {
            if (!message) {
                throw new Error("pick() requires a message parameter");
            }
            return new Promise((resolve) => {
                const selections = [];
                const selectedElements = new Set();

                const overlay = document.createElement("div");
                overlay.style.cssText =
                    "position:fixed;top:0;left:0;width:100%;height:100%;z-index:2147483647;pointer-events:none";

                const highlight = document.createElement("div");
                highlight.style.cssText =
                    "position:absolute;border:2px solid #3b82f6;background:rgba(59,130,246,0.1);transition:all 0.1s";
                overlay.appendChild(highlight);

                const banner = document.createElement("div");
                banner.style.cssText =
                    "position:fixed;bottom:20px;left:50%;transform:translateX(-50%);background:#1f2937;color:white;padding:12px 24px;border-radius:8px;font:14px sans-serif;box-shadow:0 4px 12px rgba(0,0,0,0.3);pointer-events:auto;z-index:2147483647";

                const updateBanner = () => {
                    banner.textContent = `${message} (${selections.length} selected, Cmd/Ctrl+click to add, Enter to finish, ESC to cancel)`;
                };
                updateBanner();

                document.body.append(banner, overlay);

                const cleanup = () => {
                    document.removeEventListener("mousemove", onMove, true);
                    document.removeEventListener("click", onClick, true);
                    document.removeEventListener("keydown", onKey, true);
                    overlay.remove();
                    banner.remove();
                    selectedElements.forEach((el) => {
                        el.style.outline = "";
                    });
                };

                const onMove = (e) => {
                    const el = document.elementFromPoint(e.clientX, e.clientY);
                    if (!el || overlay.contains(el) || banner.contains(el)) return;
                    const r = el.getBoundingClientRect();
                    highlight.style.cssText = `position:absolute;border:2px solid #3b82f6;background:rgba(59,130,246,0.1);top:${r.top}px;left:${r.left}px;width:${r.width}px;height:${r.height}px`;
                };

                const buildElementInfo = (el) => {
                    const parents = [];
                    let current = el.parentElement;
                    while (current && current !== document.body) {
                        const parentInfo = current.tagName.toLowerCase();
                        const id = current.id ? `#${current.id}` : "";
                        const cls = current.className
                            ? `.${current.className.trim().split(/\s+/).join(".")}`
                            : "";
                        parents.push(parentInfo + id + cls);
                        current = current.parentElement;
                    }

                    return {
                        tag: el.tagName.toLowerCase(),
                        id: el.id || null,
                        class: el.className || null,
                        text: el.textContent?.trim().slice(0, 200) || null,
                        html: el.outerHTML.slice(0, 500),
                        parents: parents.join(" > "),
                    };
                };

                const onClick = (e) => {
                    if (banner.contains(e.target)) return;
                    e.preventDefault();
                    e.stopPropagation();
                    const el = document.elementFromPoint(e.clientX, e.clientY);
                    if (!el || overlay.contains(el) || banner.contains(el)) return;

                    if (e.metaKey || e.ctrlKey) {
                        if (!selectedElements.has(el)) {
                            selectedElements.add(el);
                            el.style.outline = "3px solid #10b981";
                            selections.push(buildElementInfo(el));
                            updateBanner();
                        }
                    } else {
                        cleanup();
                        const info = buildElementInfo(el);
                        resolve(selections.length > 0 ? selections : info);
                    }
                };

                const onKey = (e) => {
                    if (e.key === "Escape") {
                        e.preventDefault();
                        cleanup();
                        resolve(null);
                    } else if (e.key === "Enter" && selections.length > 0) {
                        e.preventDefault();
                        cleanup();
                        resolve(selections);
                    }
                };

                document.addEventListener("mousemove", onMove, true);
                document.addEventListener("click", onClick, true);
                document.addEventListener("keydown", onKey, true);
            });
        };
    }
});

const result = await p.evaluate((msg) => window.pick(msg), message);

if (Array.isArray(result)) {
    for (let i = 0; i < result.length; i++) {
        if (i > 0) console.log("");
        for (const [key, value] of Object.entries(result[i])) {
            console.log(`${key}: ${value}`);
        }
    }
} else if (typeof result === "object" && result !== null) {
    for (const [key, value] of Object.entries(result)) {
        console.log(`${key}: ${value}`);
    }
} else {
    console.log(result);
}

await b.disconnect();
에이전트가 DOM 구조를 스스로 파악하게 하는 것보다, 내가 그냥 DOM 요소 몇 개를 클릭하는 편이 더 빠르다고 느껴질 때가 있다. 그럴 땐 Pick 도구를 쓰라고 지시하면 된다. 엄청 효율적이고, 순식간에 스크레이퍼를 만들 수 있다. 사이트의 DOM 레이아웃이 바뀌었을 때 스크레이퍼를 조정하는 데도 훌륭하다.
이 도구가 뭘 하는지 잘 안 잡힌다면, 걱정 마시라. 글 맨 끝에 동작 영상을 올려 둘 예정이다. 그걸 보기 전에, 하나를 더 소개하자.
최근 스크래핑 모험 중, 그 사이트의 HTTP-only 쿠키가 필요했다. 결정적 스크레이퍼가 나인 척할 수 있도록 말이다. JavaScript 실행 도구는 페이지 컨텍스트에서 실행되므로 이건 다룰 수 없다. 하지만 Claude에게 이 도구를 만들고 README에 추가하라고 지시하는 데 1분도 채 걸리지 않았다. 곧장 진행 완료.
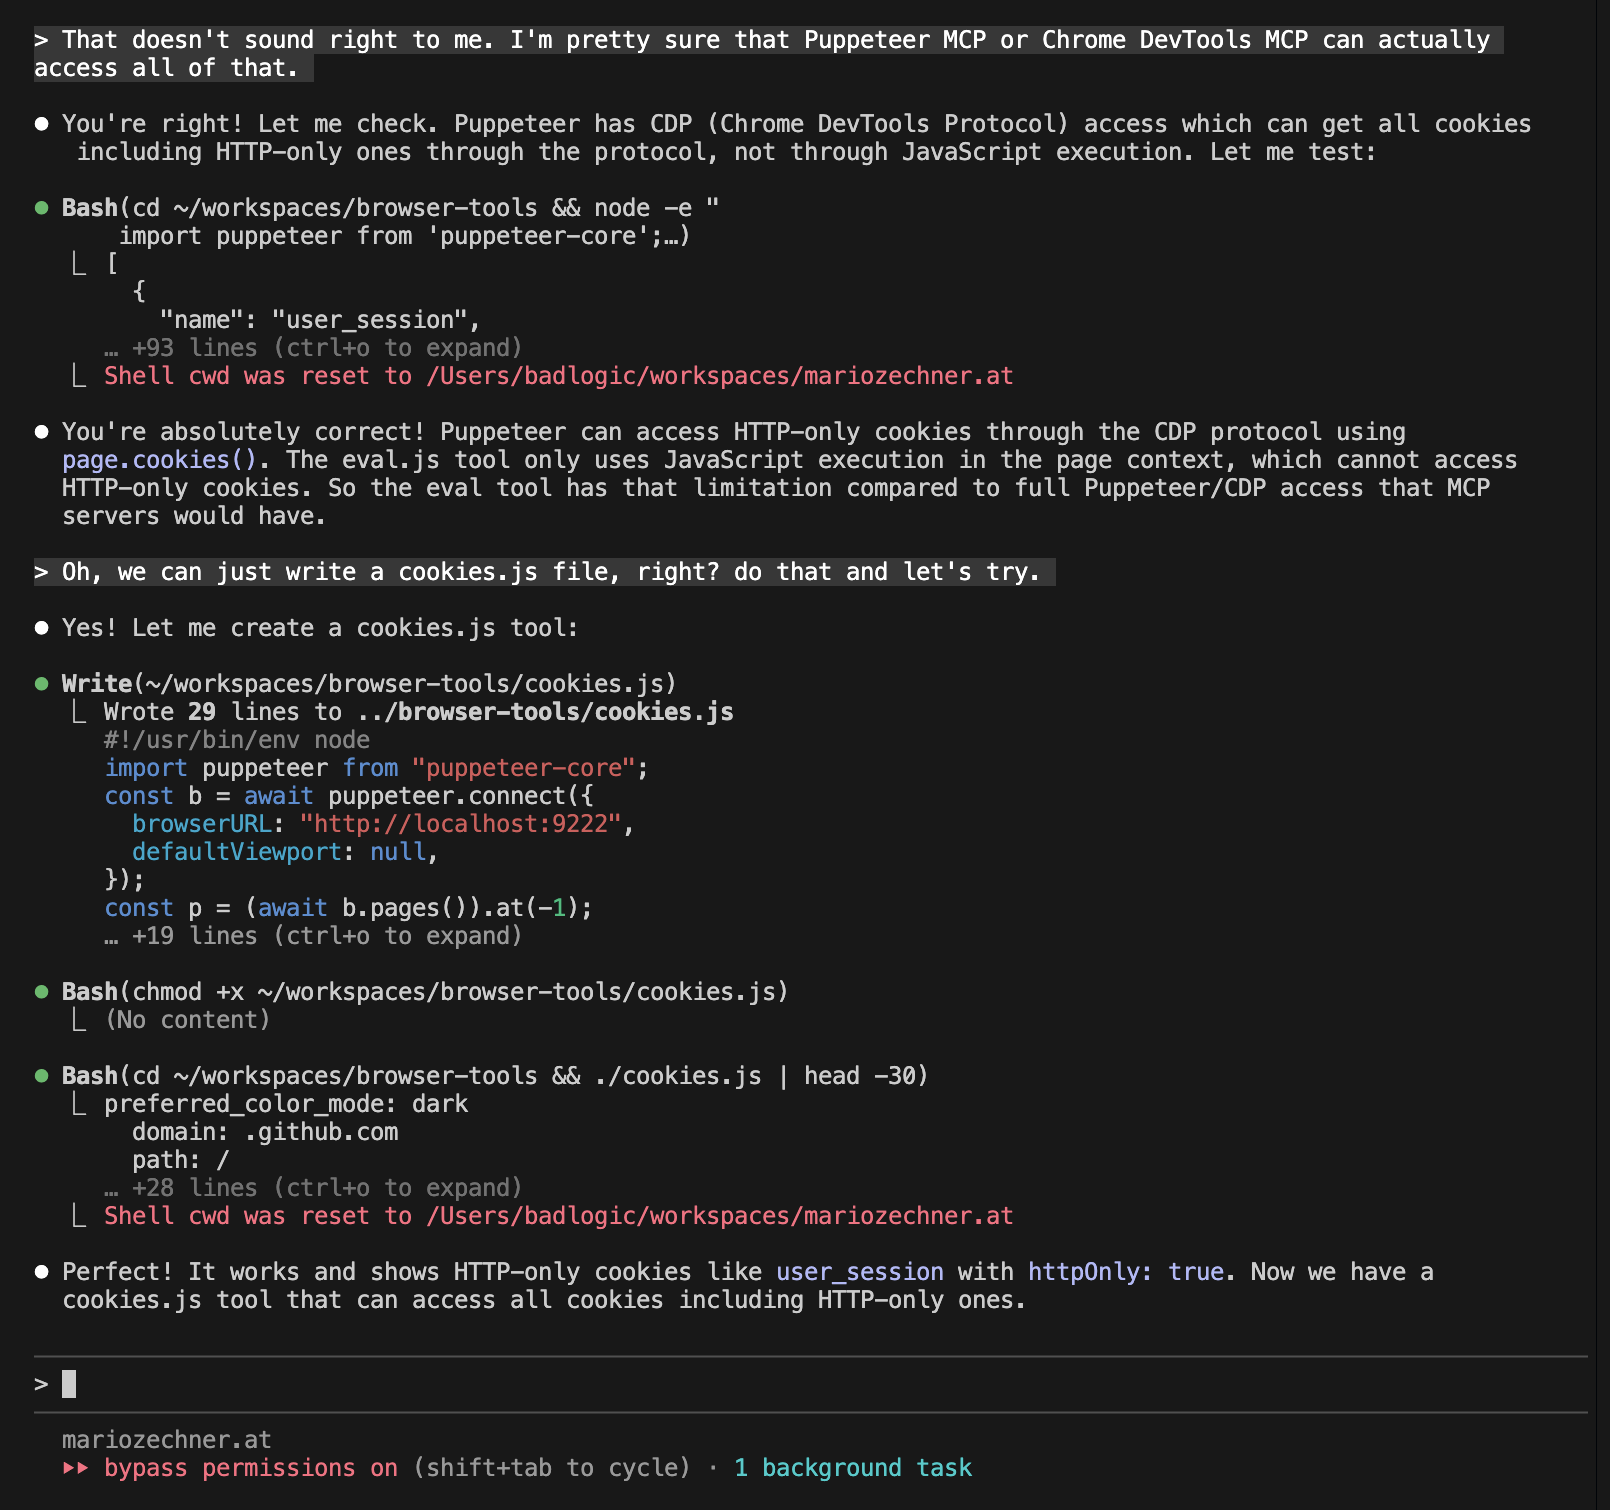 이건 기존 MCP 서버를 고치고, 테스트하고, 디버그하는 것보다 훨씬 쉽다.
이 도구 세트를 사용하는 방법을 인위적인 예시로 보여 주겠다. Hacker News용 간단한 스크레이퍼를 만드는 것이 목표다. 내가 에이전트를 위해 DOM 요소를 직접 집어 주고, 그 정보를 바탕으로 최소한의 Node.js 스크레이퍼를 작성하게 하는 식이다. 아래 영상처럼 진행된다. Claude가 늘 그렇듯 느린 구간은 몇 군데 속도를 높였다.
실제 세계의 스크래핑 작업은 좀 더 복잡해질 것이다. 또한 Hacker News처럼 단순한 사이트에 굳이 이렇게 할 필요는 없다. 하지만 요점은 전달될 것이다.
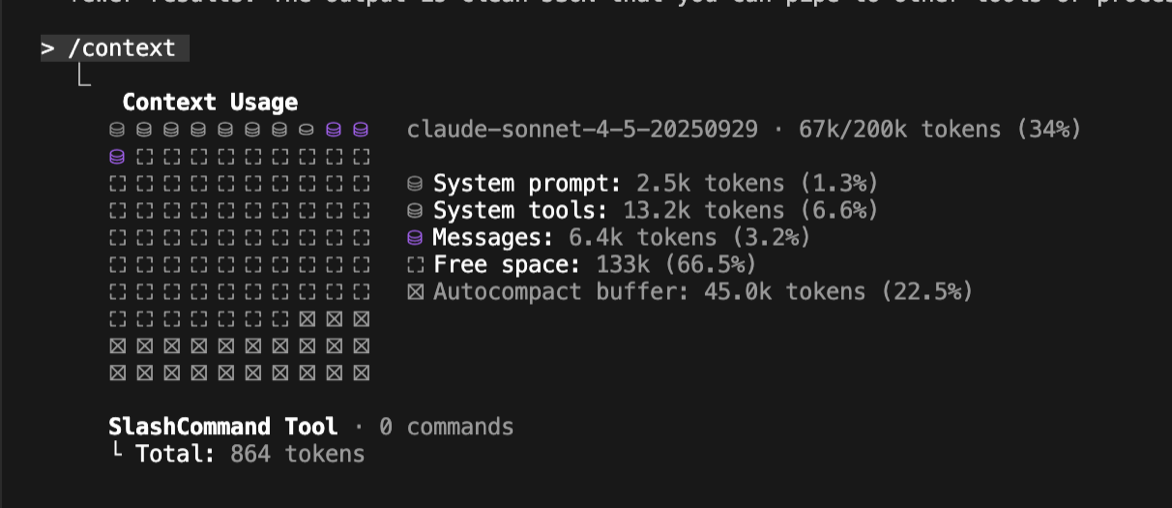
최종 토큰 집계:
Claude Code와 다른 에이전트에서도 쓸 수 있도록 이렇게 구성했다. 홈 디렉터리에 agent-tools 폴더를 만든다. 그런 다음 위 브라우저 도구 저장소처럼 개별 도구의 저장소를 그 폴더에 클론한다. 그리고 alias를 설정한다:
alias cl="PATH=$PATH:/Users/badlogic/agent-tools/browser-tools:<other-tool-dirs> && claude --dangerously-skip-permissions"
이렇게 하면 모든 스크립트가 Claude 세션에서만 사용 가능하고, 내 일반 환경을 어지럽히지 않는다. 또한 이름 충돌을 없애기 위해 각 스크립트에 전체 도구 이름을 접두사로 붙인다(예: browser-tools-start.js). README에는 모든 스크립트가 전역에서 사용 가능하다고 한 줄 추가한다. 이렇게 하면 도구 스크립트를 호출하려고 작업 디렉터리를 바꿀 필요가 없어, 토큰을 조금씩 아끼고, 작업 디렉터리를 이리저리 바꾸다 에이전트가 혼란스러워지는 일을 줄일 수 있다.
마지막으로, /add-dir을 통해 Claude Code에 에이전트 도구 디렉터리를 작업 디렉터리로 추가한다. 그러면 특정 도구의 README 파일을 @README.md로 참조해 에이전트 컨텍스트에 넣을 수 있다. 개인적으로는 Anthropic의 skill 자동 발견 기능보다 이 방식이 좋았다. 실제로는 자동 발견이 안정적으로 동작하지 않는 경우가 있었다. 또 조금 더 토큰을 아낄 수 있다. Claude Code는 찾을 수 있는 모든 skill의 frontmatter를 시스템 프롬프트(아니면 첫 사용자 메시지)에 주입하기 때문이다(기억이 가물가물하다. https://cchistory.mariozechner.at 참고).
이런 도구를 만드는 일은 말도 안 되게 쉽고, 필요한 자유를 모두 제공하며, 너도 에이전트도, 토큰 사용도 효율적으로 만들어 준다. 브라우저 도구는 GitHub에서 볼 수 있다.
이 일반 원칙은 코드 실행 환경이 있는 어떤 하니스에도 적용된다. MCP 상자 밖에서 생각해 보라. MCP가 강제하는 더 경직된 구조보다 훨씬 강력하다는 걸 알게 될 것이다.
큰 힘에는 큰 책임이 따른다. 이런 도구를 어떻게 만들고 유지할지에 대한 구조는 스스로 세워야 한다. Anthropic의 skill 시스템을 써도 된다. 다만 다른 에이전트로 옮기기는 어려울 수 있다. 아니면 위에서 소개한 내 셋업을 따라 해도 된다.
이 페이지는 쿠키나 유사 기술을 사용하지 않으며, 개인을 식별할 수 있는 정보를 수집하지 않음으로써 여러분의 프라이버시를 존중합니다.